
Do you want to hang a pendant light in your kitchen or dining room but don’t know how to extend the cord? If so, then this blog post is for you! Whether installing a brand-new pendant light or relocating an existing one, understanding how to properly extend a lighting cord is essential knowledge. In this guide, we’ll provide you with all the steps needed for extending cords accurately and safely.

We’ll start by looking at why it’s important to have the right length of cable before discussing what type of materials are best used when extending cords, as well as providing our top tips on how to extend pendant light cord for smooth installation processes. So if you’re ready to lengthen those cords and install beautiful pendant lights around your home – let’s get started!
What is Pendant Light Cord?
Pendant light cords consist of a metal wire/cable that contains an electrical current, as well as a plastic covering to protect it from the elements. The cord runs from your wall outlet up to the ceiling where the pendant light is hung. Having the right length of the cable ensures there will be no kinks in the cord when you hang your pendant light, which makes the installation process much simpler.
Why is it Important to Have the Right Length of Cord?
Having the right length of cord is essential for two reasons: Firstly, if there is too little cord, you won’t be able to hang your light in the desired position, and secondly, if there is too much cord, it will bunch up at the ceiling or wall, creating an unappealing look. Therefore, it’s important to measure the exact length needed before extending a cord for optimal results.

What Materials Should I Use When Extending Cords?
When extending cords, it’s essential to use materials that can handle the electrical current and will not become damaged over time due to exposure to the elements. The most commonly used materials for pendant light cord extensions are:
- Braided electrical cable
- Stranded electrical wiring
- Plastic conduit
10 Ways How to Extend Pendant Light Cord
1. Measurement
Measure the length of the existing cord from the outlet to the pendant light and subtract 2-3 feet (depending on how far from the wall or ceiling you want your new light to hang). This will give you an approximate idea of how much additional cord is needed for extension purposes. Also, make sure you measure the cord along the wall as it runs up to the ceiling.
2. Choose Your Extension Materials
After you have measured the new length of your cord, choose materials that are suitable for electrical wiring and will properly extend your pendant light cord. The options mentioned above are all excellent choices.
3. Cut & Strip Wires
Carefully cut the existing cord and strip a few inches of its outer insulation to expose the internal wiring. Make sure you keep track of which wire is live (black) and which is neutral (white).
4. Attach New Wires
Once you have exposed the inner wiring, attach your new extension cord to the existing one using electrical crimp connectors. Make sure the connectors are securely fastened and no exposed wires are showing.
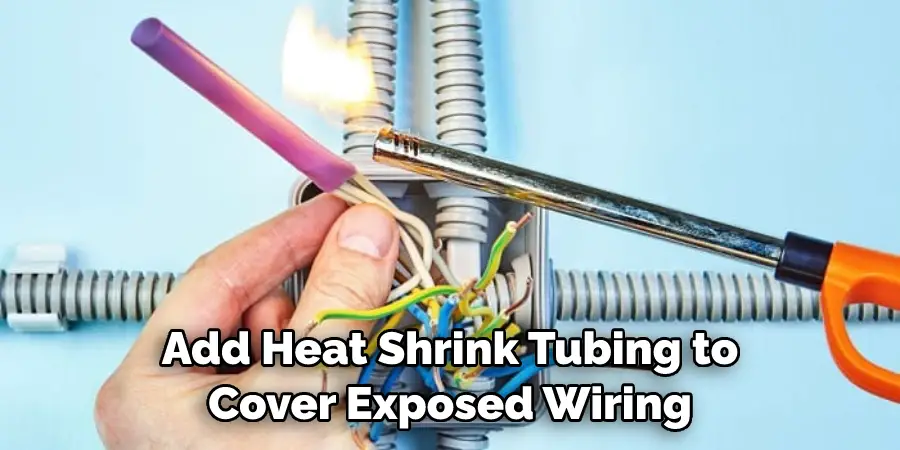
5. Add Heat Shrink Tubing
Once you have attached the new extension cord, add heat shrink tubing to cover any exposed wiring for added protection from damage or shock. Adding heat shrink tubing will also make the connection look more professional and neat.
6. Secure Cords
Secure the cords to the wall or ceiling by using cable clips, making sure that there is enough slack for the pendant light to hang freely. Keep in mind that excess cord can be tucked away behind furniture or other fixtures for further concealment.
7. Test Cord
Before installing the pendant light, plug the cord into a wall outlet and make sure it is working properly. The light should turn on when turned on at the switch and turn off when turned off at the switch. If there is no power or the cord does not work correctly, then double-check your connections and re-test before continuing.
8. Hang Lights
Once you have tested the cord, it’s time to hang your pendant light. Use a proper bracket or hook, and make sure the pendant light is securely fastened before plugging in the cord. Hanging a pendant light is relatively easy and should take no more than 30 minutes from start to finish.
9. Make Safety Checks
After you have installed your new pendant light, make sure it is secure and there are no exposed wires or connections that could cause an electrical hazard. If everything looks good, then you can turn on the switch and enjoy your new light in its new home.
10. Enjoy Your New Light
After completing all the steps above, it’s time to sit back and enjoy your newly installed pendant light! Whether you’re looking to bring a little more light into your kitchen or dining room, having the right length of cord is essential for any pendant light installation. With this guide in hand, you should now have all the knowledge needed for extending cords safely and accurately.
Now that we’ve provided you with detailed steps on how to extend pendant light cord, you are now one step closer to achieving perfectly lit and stylish rooms throughout your home. Thanks for reading, and we hope this guide was of help!
8 Common Mistakes to Avoid When Extending Pendant Light Cord
When extending a pendant light cord, it can be easy to make some common mistakes that will affect the quality and safety of your project. To ensure that you get the best results when extending your pendant light cord, here are 8 key mistakes to avoid:
- Not using the right supplies. Make sure you use the correct cord for your project; check if it is suitable for both indoor and outdoor use and that it supports the wattage of your fixture. Also, use the right mounting accessories to secure your new cord.
- Not using a tension relief device. When you extend the cord, it is important to use a tension relief device to ensure that excessive tension does not build up on the electrical connection points of your pendant light fixture.
- Forgetting about strain relief devices. In addition to a tension relief device, you should also use a strain relief device. This helps to prevent the cord from becoming disconnected from the fixture due to movement or vibration.
- Not measuring twice and cutting once. Before making any cuts on your new cord, make sure that you measure correctly so you don’t cut too much or too little off the end of the cord.
- 5. Using the wrong type of wire connector. Make sure that you use a wire connector that is suitable for the wattage of your fixture and the cord type, such as twist-on or crimp connectors.
- Not using heat shrink tubing. To protect the electrical connections from dirt and moisture, it is important to use heat shrink tubing when connecting the wires.
- Not wrapping exposed wire with electrical tape. Make sure to wrap any exposed wire with electrical tape to protect yourself and others from potential electric shocks.
- Overloading the circuit or fixture. When you extend your pendant light cord, it is important not to overload the circuit or fixture by exceeding its wattage rating. Fixture wattage ratings can be found in the instructions or on the fixture itself.

Following these tips will help to ensure that your project turns out safely and correctly when extending a pendant light cord.
Frequently Asked Questions
How Often Do You Need to Change Pendant Light Cord?
It depends on how often you use the pendant light. Generally, it is recommended to replace it every 5-7 years. If the cord shows any signs of wear and tear, such as fraying or cracking, then you should replace it sooner. Also, if you have made any modifications to the cord, such as extending it for a longer reach or cutting it back to a shorter length, then it is recommended to replace it at least every 3-4 years.
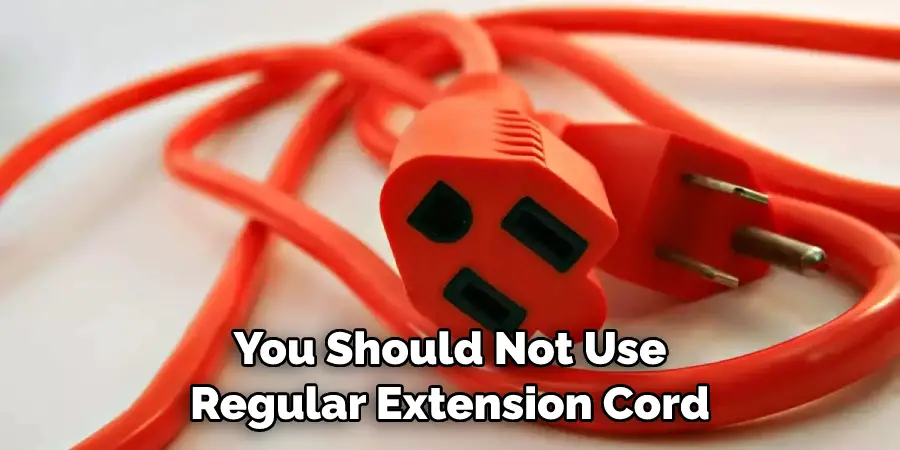
Can You Use a Regular Extension Cord with Pendant Lights?
No, you should not use a regular extension cord with pendant lights. Regular extension cords are not designed to handle the load of pendant lights and can cause an electrical hazard if not installed correctly. It is best to use an electrical cord that has been rated for indoor/outdoor use and is suitable for the wattage of your pendant light fixture.
What Is a Tension Relief Device?
A tension relief device is a device that helps to reduce the strain on electrical connection points by allowing excess slack in the cord. This can be especially important when extending a pendant light cord, as it prevents any tension from building up on the electrical connections. The tension relief device is also known as a strain relief or cord grip.
Conclusion
Overall, extending a pendant light cord is an easy but rewarding chore. You’ll need some basic tools, and be sure to follow the steps given in this article. After you do, your room will look more stylish than ever before! Make sure to pay attention when installing a junction box since it’s essential for safety. And if you feel uncertain about working with electricity yourself, it’s important to hire a professional electrician.
With several simple steps on how to extend pendant light cord and cautionary measures along the way, you’ll be able to extend the pendant light cord with ease and confidence. All in all, reinvigorating an old or outdated pendant light is an economical and effective way to add flavor and charm to any room in your home – whether it be the kitchen, living room, or bedroom!