
Are you looking to take your flounder gigging experience up a notch? Then, check out this tutorial on how to make flounder gigging lights! With just a few simple materials, you’ll be able to light up the night and bring in more fish. Keep reading for instructions.
Summary: Flounder gigging lights are specialized underwater lights used to illuminate shallow coastal waters while hunting for flounder and other fish species at night. They can be either handheld or mounted on a boat, and must be waterproof, durable, and bright enough to reveal the fish hiding on the ocean floor. Creating your own flounder gigging lights can be a cost-effective alternative to purchasing commercial options, and can be tailored to suit your specific gigging needs.
To make flounder gigging lights, start by selecting a suitable light source, such as waterproof LED light strips, LED bars, or high-lumen LED bulbs. LEDs are ideal for this purpose because they are energy-efficient, bright, and produce minimal heat. Next, choose a power source, typically a 12V battery or a portable power bank, ensuring that it has adequate capacity to last throughout your gigging expedition. You’ll also need waterproof housing or enclosures for the lights and any electrical connections, as well as a way to mount the lights to your boat or create a handle for handheld use.
Assemble the components by connecting the LED lights to the power source, making sure to use waterproof connectors and properly sealing any exposed wiring with waterproof tape or heat shrink tubing. Finally, test the lights in a controlled environment before taking them out on the water to ensure they function correctly and remain watertight. Always exercise caution when working with electricity and water, and consider consulting with someone experienced in creating flounder gigging lights if you’re unsure about any aspect of the process.

What Is a Flounder Gigging Lights?
Flounder gigging is a popular sport in coastal areas where flounder are plentiful. The gigging lights are used to attract the flounder to the area so that they can be caught. These lights are usually bright and flashing, and they attract the flounder from a long-distance away.
The lights are often set up in an area where there is a lot of baitfish so that the flounder will have something to eat when they come to light. Gigging for flounder is a great way to get fresh seafood, and it can be a lot of fun.
Why Should You Make Flounder Gigging Lights?
Flounder gigging is a popular activity in many coastal areas. The fish are attracted to the light, making them easy to catch. However, not just any light will do. For the best results, you should make your flounder gigging lights. Store-bought lights can be expensive, and they may not be as effective as homemade lights. Plus, it’s fun to make your lights and customize them to suit your needs.
When making flounder gigging lights, you’ll need to choose a light source, such as LEDs or incandescent bulbs. You’ll also need a clear container, such as a glass jar or plastic bottle. Fill the container with water, and then add the light source. Be sure to use a waterproof sealant to keep the water out.
Things You’ll Need
- PVC Pipe
- Copper Wires
- Soldering Iron
- Electrical Tape
- Drill
- Screwdriver
- Pliers
- Jigsaw
- Sandpaper
- Fish gigging light
How to Make Flounder Gigging Lights Step by Step Guide
Step 1: Determine
You should think about a few things before making your flounder gigging lights. The size of the light, how many lights you want, and what type of light you want are all important factors.

Step 2: Prepare Your Work Area
Once you have all of your supplies, it’s time to work! First, clear off a work surface and set out everything you need. This will help make the process go smoothly.
Step 3: Making the Light Stand
The light stand is made from a 2″ x4″ piece of lumber. Cut the board to 24″ in length. Use a straight edge and a circular saw to cut. Drill a hole in one end of the board large enough for the threaded bolt to pass through. The hole should be drilled in the center of the board and should be 3/4″ in diameter.
Step 4: Making the Light Mount
The light mount is made from a piece of plywood that is cut to a square shape. There is a hole in the center of the plywood that is big enough for the threaded bolt to go through.
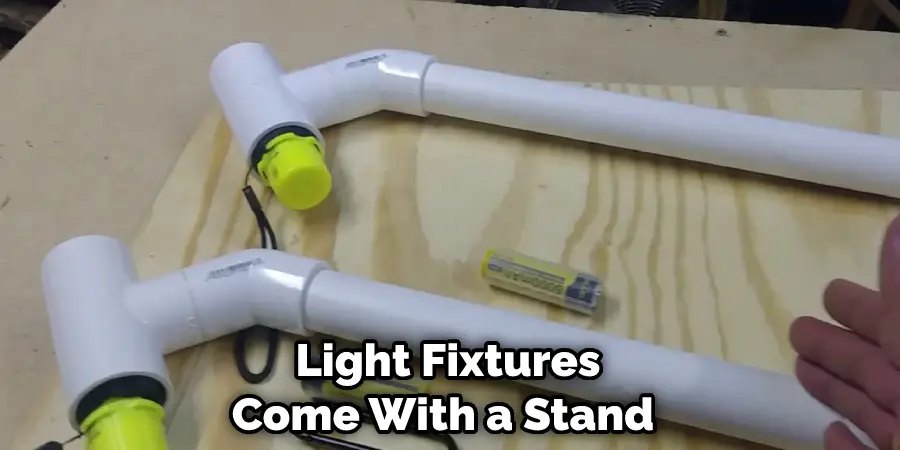
Step 5: Setup the Light Fixture
Now that you have the light fixture, it is time to set it up. This will vary depending on the light fixture you have, but most will require that you mount it to the top of your boat. Ensure that it is secure and will not move around while you are gigging.
Some light fixtures come with a stand that you can use to prop it up, while others require that you mount it directly to the boat. If your light fixture does not come with a stand, you can purchase one separately.
Step 6: Wiring the Lights
Now it is time to wire the lights. This part can be a bit tricky, so take your time. First, cut two pieces of wire that are about 12 inches long. Next, strip off the insulation on each end of each wire.
Next, twist the ends of each wire together to create a loop. Then, do the same thing with the other two wires.
Now, it is time to attach the lights. Take one of the wires with the loop on it and twist it around one of the screws on the light. Do the same thing with the other wire. Make sure that the lights are facing the right direction before you screw them in place.
Step 7: Assembling the Stand and Mount
The stand and mount can be assembled using the screws and bolts in the kit. The stand is a pole that has a threaded top which the mount screws into. The mount itself has two arms, one of which holds the light while the other provides a stable base.
To assemble the stand, first, screw the top piece into the bottom of the stand. Then, using the bolts and washers that come with the kit, attach the arms of the mount to the top of the stand. Make sure that the arms are parallel and that the light is pointing in the desired direction.
Finally, use a drill to make a hole in the desired location and screw the stand.
Step 8: Testing Your Lights
The light mount is made from a piece of 1/2″ inch plywood that is cut into a 5″ x5″ square. Drill a hole in the center of the plywood that is large enough for the threaded bolt to pass through. The hole should be drilled in the center of the plywood and should be 3/4″ in diameter.

Flounder gigging is a fun and exciting way to catch dinner. By using flounder gigging lights, you will be able to see the fish better and increase your chances of catching one. Follow these simple steps to make your flounder gigging lights, and you will be ready to go! Keep reading for more information about how to make flounder gigging lights.
Some Tips for Making Flounder Gigging Lights:
- Choose the right type of light: The best lights for flounder gigging are bright and focused, so choose a LED light with a narrow beam.
- Use a PVC pipe: You can use a PVC pipe as the base for your light. Cut the pipe into the desired length and then use a heat gun to mold the plastic into a curve or a U-shape.
- Attach the LED light: Once you have your PVC pipe base, you can then attach your LED light to the end of the pipe. Use a strong adhesive to hold the light in place.
- Add a battery: You can power your LED light with a 12-volt battery. Make sure to choose a battery with enough power to run your light for hours.
- Create a handle: To make your flounder gigging light easier to use, you can add a handle to the back of the PVC pipe. Use a PVC elbow joint to attach the handle to the pipe.
- Test your light: Before heading out to gig flounder, make sure to test your light in a dark area. This will help you ensure that the light is bright enough to attract flounder, and that the battery has enough power to last the entire fishing trip.
By following these tips, you should be able to make a flounder gigging light that is effective and easy to use.
How Do You Make Handheld Flounder Gigging Lights
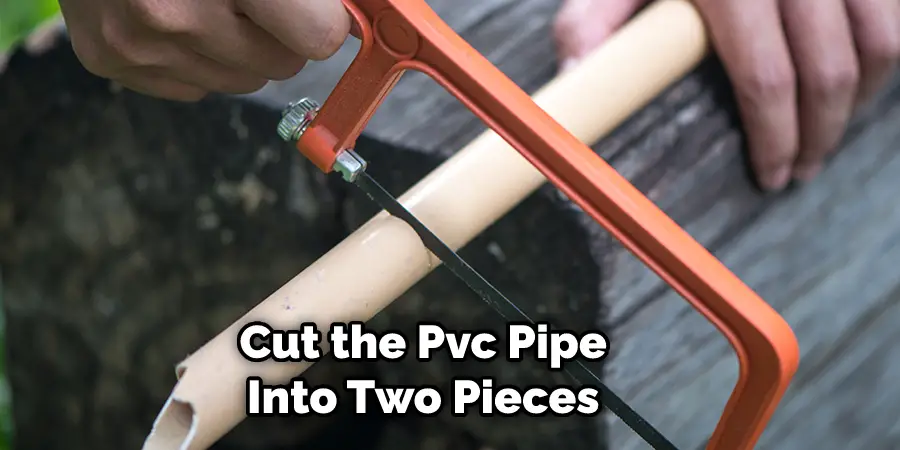
There are a few things you need to make your handheld flounder gigging lights. The first is a PVC pipe. This needs to be at least two inches in diameter and about three feet long. You will also need a small light bulb, some wire, electrical tape, and a switch.
First, cut the PVC pipe into two pieces to make the light, each about a foot long. Drill a small hole in one end of each piece of PVC pipe. Next, cut the light bulb wire to be about two feet long. Strip the ends of the wire and twist them together. Thread the wire through the hole in the PVC pipe and seal it with electrical tape.
Thread the switch through the other hole in the PVC pipe and seal it with electrical tape. Attach the light bulb to the end of the wire. Cover the entire light assembly with electrical tape to keep it watertight.
Now you are ready to go fishing for flounder! When you see a flounder swimming below, shine the light on it and gig it!
How Many Lumens Do You Need for Flounder Gigging
When it comes to gigging flounder, having the right light is key. Not only does it help you see the fish better, but it also helps to attract them. So, how many lumens do you need for flounder gigging?
The answer to that question depends on a few factors. For starters, how big is your fishing area? If it’s a small area, you’ll need fewer lumens than if it’s a large one. Additionally, how deep is the water? The deeper the water, the more lumens you’ll need. As a general rule of thumb, for every foot of depth, you’ll need 10 lumens per square foot. So, if you’re fishing in a 10×10 area that’s 3 feet deep, you’ll need 300 lumens. However, if you’re fishing in a 10×10 area that’s 30 feet deep, you’ll need 3,000 lumens.
Ultimately, you’ll want to use a light with at least 1,000 lumens. However, if you’re in a particularly deep area, you may need more. With the right light, you’ll be able to gig flounder and have a great time doing it easily! If you want to know more about how to make flounder gigging lights keep reading.
Frequently Asked Question
Can You Flounder Gig with A Headlamp?
When flounder gigging, you need to be able to see the fish in the water. This means having some source of light. Some people gig with a headlamp, but this can be not easy because you have to keep your hand on the light and hold the gig at the same time. It is much easier to use a flounder gigging light.

What Time of Night Is Best for Flounder Gigging?
There is no definitive answer to this question as different fishers have different opinions. Some people believe that the best time for flounder gigging is at night when the fish are more active and easier to catch. Others believe that the best time is early in the morning when the sun is just coming up, and the fish are less active. Ultimately, it is up to the individual fisherman to decide what time of night they think is best for flounder gigging.
Can You Flounder Gig During the Day?
The answer to this question is yes; you can flounder gig during the day; however, it can be difficult to spot them. Flounders like to bury themselves in the mud, so they are not as visible during the day. However, if you have some good flounder gigging lights, you should be able to spot them fairly easily.
You Can Check It Out To Put a Regular Light Bulb in a Bathroom Heat Lamp
Conclusion
So, how to make flounder gigging lights? It’s quite simple. All you need are some basic supplies and a little bit of creativity. We hope you enjoyed this tutorial, and we can’t wait to see your finished product!
You Can Check It Out To Use Dimmable Light Bulbs Without Dimmer