Are you tired of staring at that outdated light fixture in your home? As much as you want to replace it with a brand new one, maybe it’s not in your budget, or you don’t want to bother with the installation hassle. Instead, why not give it a fresh new look with a simple paint job? In this blog post, we will guide you through the steps of how to paint a light fixture without taking it down.
Can You Paint a Light Fixture without Taking It Down?
Have you ever looked at your light fixtures and wished they looked more modern and fresh? Luckily, there’s a way to update them without the hassle of taking them down. By using the right type of paint and following a few simple steps, it’s possible to transform the look of any light fixture without unscrewing a single bolt.
Whether you’re looking to add a pop of color or need to refresh an outdated fixture, painting it in place can be a quick and inexpensive DIY project that gives your space a whole new vibe. So why not grab some paint and give it a try? You might love the results.
Why Should You Paint a Light Fixture without Taking It Down?
Painting a light fixture is a simple and cost-effective way to update the look of any room. And the best part? You don’t even have to take it down! With a few easy steps, you can transform a plain and outdated fixture into a stylish and modern piece that complements your decor.
So why bother with removing the fixture and risking damage or injury? Instead, grab some paint and a brush, and get ready to enhance the ambiance of your space with a freshly painted light fixture. Not only will it breathe new life into your room, but it will also save you time and money.

7 Steps to Follow on How to Paint a Light Fixture without Taking It Down
Step 1: Preparation
Before diving into any painting project, it’s important to prepare your work area. Start by laying out a drop cloth or old sheet to cover the floor beneath the fixture. Then, switch off the power to the light fixture by turning off the circuit breaker or by unscrewing the light bulb. You don’t want to get electrocuted or risk damaging the fixture.
Step 2: Cleaning
Next, thoroughly clean the light fixture to remove any dust, dirt, or grime. You can use a mild soap and water solution or a gentle multi-purpose cleaner to wipe down the surfaces. Rinse with clean water and let it dry completely before moving on to the next step.
Step 3: Masking
To protect the working parts of the fixture that you don’t want to paint, mask off any areas with painter’s tape or masking tape. Make sure to cover any exposed wires, sockets, or switches. You can also cover the light bulb or remove it altogether.
Step 4: Priming
To ensure the paint adheres well and lasts longer, apply a coat of primer to the fixture. Depending on your preference, you can use a spray primer or a brush-on primer. Be sure to follow the instructions on the label and apply it evenly and thinly. Let the primer completely dry before moving on to the next step.
Step 5: Painting
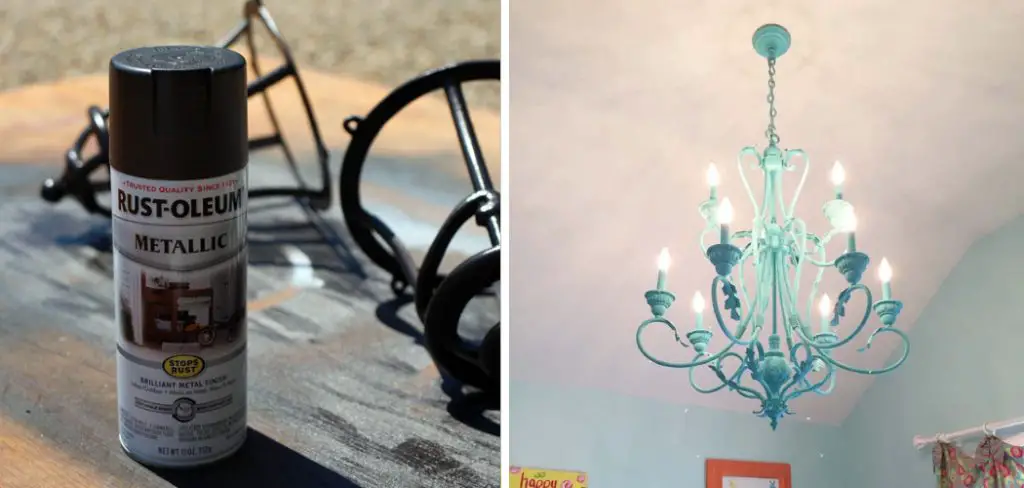
Next, it’s time to add your desired paint color. Again, you can use spray paint or brush-on paint. Work in light, even strokes, and cover all surfaces. It’s better to apply multiple thin coats than one thick coat, as it will reduce the risk of drips or puddles. Allow each coat to dry completely before applying the next one. You can add additional coats until you achieve your desired finish.
Step 6: Finishing Touches
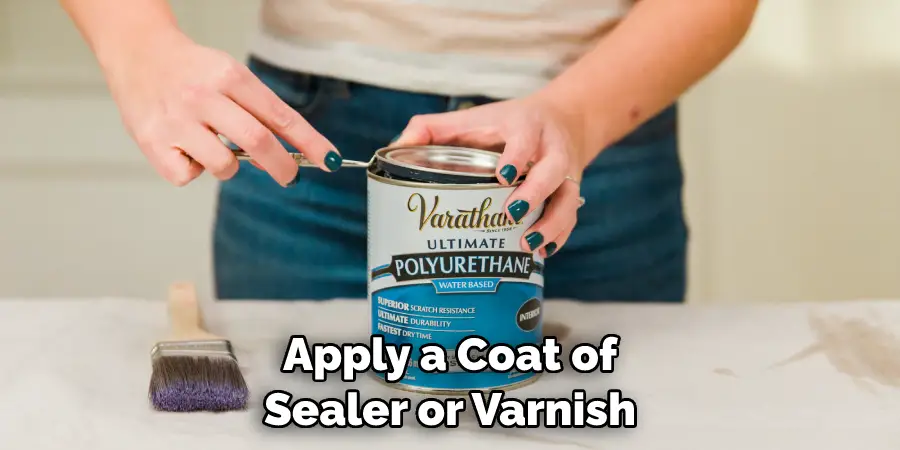
Once your paint is completely dry, apply a coat of sealer or varnish to protect the paint and give it an extra shine. Make sure to follow the instructions on the label. Allow the sealer or varnish to dry before moving on to the next step.
Step 7: Re-Installation
Finally, remove the painter’s tape and any other masking material. Carefully re-install the fixture to its original position. Turn on the power and check if everything is working properly. Admire your handiwork!
That’s it! You now know how to paint a light fixture without taking it down. With just a few simple steps, you can give your home a fresh and modern look without spending time or money on a replacement. So go ahead and get creative with your light fixtures! Who knows, maybe you’ll even start a trend in your neighborhood.
5 Considerations Things When You Need to Paint a Light Fixture Without Taking It Down
1. Safety
When painting a light fixture, safety should be the number one priority. Turn off the power to the light before you begin, and use protective gear such as gloves, goggles, and a dust mask. Additionally, use a ladder or step stool when reaching high fixtures to prevent falls.
2. Surface Preparation
The surface of the light fixture must be properly prepared before painting for the paint to adhere correctly. This includes cleaning the surface with soap and water and then sanding it lightly with a fine-grit sandpaper. Any cracks or holes should also be filled with spackling compounds before painting.
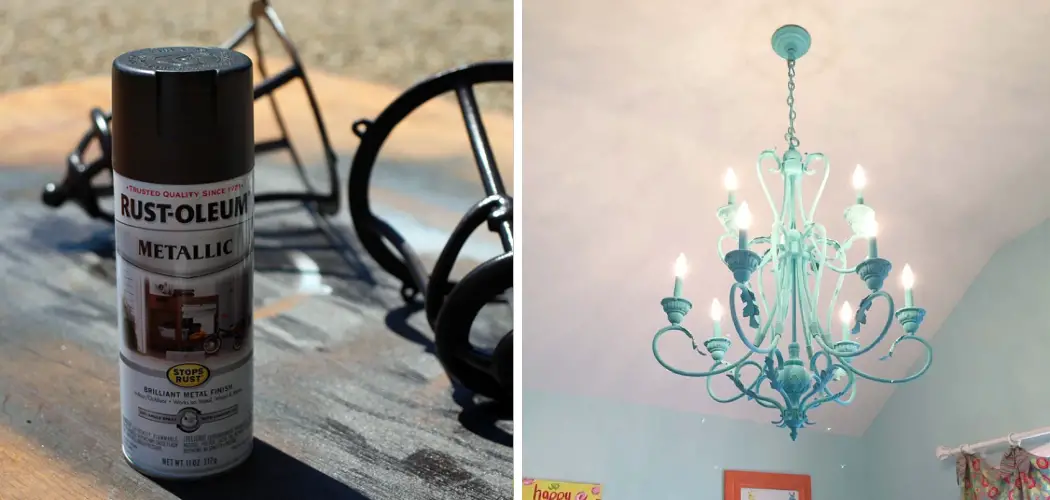
3. Paint Selection
The type of paint used will depend on what type of material your light fixture is made from. For metal fixtures, use an oil-based paint that is designed specifically for metal surfaces; for plastic fixtures, use a latex-based paint that is designed for plastic surfaces; and for wood fixtures, use an acrylic-based paint that is designed for wood surfaces.
4. Painting Technique
When painting your light fixture without taking it down, it’s important to use the right technique to get even coverage without leaving behind brush strokes or drips. Start by applying thin coats of paint using a small brush or roller and allow each coat to dry completely before applying additional coats until you achieve your desired finish.

5. Aftercare
Once your light fixture has been painted, it’s important to take proper care of it to keep it looking its best over time. To protect against scratches and chips, apply a clear coat sealer after the final coat of paint has dried completely; this will also help protect against fading due to UV exposure over time. Additionally, clean your painted light fixture regularly with mild soap and water to keep it looking its best for years to come!
3 Benefits of Paint a Light Fixture Without Taking It Down
1. Increased Safety
One of the primary benefits of painting a light fixture without taking it down is increased safety. Painting a light fixture while still installed in the ceiling eliminates the need to work with ladders or other equipment, which can be dangerous. Additionally, painting a light fixture without taking it down eliminates the risk of accidentally dropping it and causing damage or injury.
2. Time Savings
Painting a light fixture without taking it down can also save time. Taking down a light fixture requires several steps, including disconnecting the wiring and carefully removing the screws that hold it in place. This process can take several minutes, depending on the type and size of the light fixture. Painting a light fixture without taking it down eliminates this step and saves time in the long run.
3. Cost Savings
Finally, painting a light fixture without taking it down can save money. Replacing an entire light fixture can be expensive, as installation fees are often associated with hiring an electrician to do the job. By painting a light fixture without taking it down, you can avoid these costs and save money in the long run.
Some Common Mistakes People Make When Trying to Paint a Light Fixture Without Taking It Down
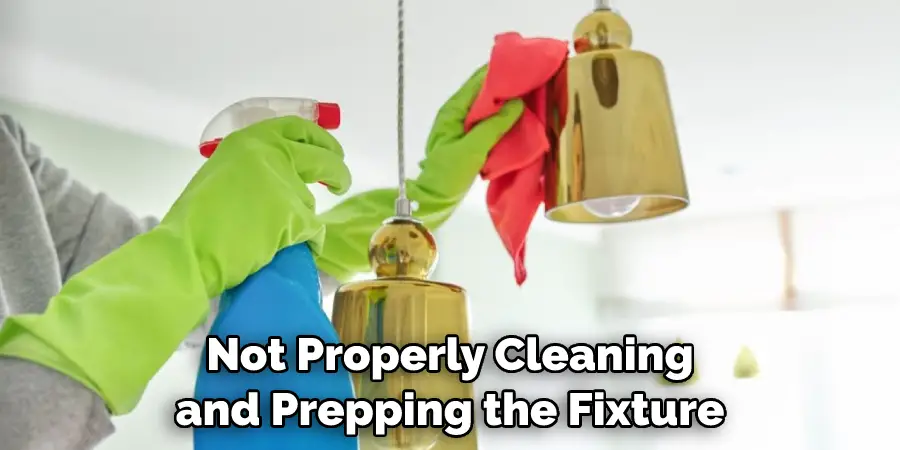
Painting a light fixture without taking it down can be a time-saver and a simple way to update a room’s decor. However, it’s important to be aware of the common mistakes people make when attempting this DIY project. One mistake is not properly cleaning and prepping the fixture before painting, which can result in a sloppy and uneven finish.
Another mistake is using the wrong type of paint or not using a primer, causing the paint to chip or peel over time. Lastly, not waiting long enough for the paint to fully dry can result in smudging or ruining the final look of the fixture. Taking the time to prep and paint a light fixture properly can lead to a beautiful and successful DIY project.
Conclusion
Painting a light fixture is a simple and cost-effective way to update your home decor. By following these easy steps, you can give your outdated fixture a new lease on life without having to remove it. Remember always to prioritize safety and to prepare your work area properly. With a little bit of effort and patience, you can achieve a professional-looking finish that will make your light fixture the highlight of any room. Thanks for reading our post about how to paint a light fixture without taking it down.