
If you’re looking to grow your cannabis, you may be wondering whether or not to set up a grow tent. A grow tent can create the perfect environment for your plants, and with LED lights, it’s easier to get started. In this blog post, we’ll walk you through the steps of how to set up a grow tent with led lights so you can start growing your cannabis today.
Growing cannabis indoors can provide healthier plants, more privacy, and an earlier harvest. One of the most popular ways to grow cannabis is in a grow tent. Setting up a grow tent with LED lights is a simple process that can be completed in just a few hours.

Why You Should Use a Grow Tent
There are several reasons why you might want to use a grow tent, especially if you’re growing cannabis, including:
Creating a Controlled Environment
Using a grow tent, you can control you grow space’s temperature, humidity, and ventilation. This is important for your plants’ health and for creating the ideal conditions for growing cannabis.
Maximizing Space
Grow tents are the perfect solution for growing cannabis in small spaces like closets or attics. This way, you can keep your grow operation hidden away from prying eyes, even if you don’t have a lot of space to work with.
It Easy to Set Up and Take Down
Grow tents are easy to set up and take down, making them ideal for people who are just growing cannabis. You can also move your grow tent to a new location if necessary.

What You Need to Set Up a Grow Tent With Led Lights
Before you get started, you’ll need to gather the following items:
- A grow tent
- LED lights
- An exhaust fan
- Carbon filter
- Thermometer
- Hygrometer
- Timer
- Soil
- Cannabis seeds or clones
A Complete Guide on How to Set Up a Grow Tent With Led Lights:
1. Choose the Right Location for Your Grow Tent
The first step to successful indoor gardening is choosing the right location for your grow tent. You’ll want to pick a spot that’s out of the way and away from any windows. The spot you choose should also have easy access to an electrical outlet. Try to avoid setting up your grow tent in a damp or humid area. Instead, choose a spot that’s well-ventilated and has plenty of airflow.

2. Set Up Your Grow Tent
A grow tent is a special kind of tent that is used to grow plants. To set up a grow tent, start by placing it on the ground and unfolding it. Next, insert the metal poles into the grow tent and connect them at the top. Once the frame is assembled, hang the grow tent fabric from the frame. Make sure the fabric is tight, and there are no gaps.
3. Install Your LED Lights
The next step is to install your LED lights. Start by hanging the lights from the grow tent frame. Make sure the lights are evenly spaced and at the correct height. Once the lights are in place, plug them into an electrical outlet. If you’re using multiple lights, you’ll need to use a power strip with an on/off switch.
4. Connect LED Lights to a Timer
Connecting your LED lights to a timer is important, so they automatically turn on and off. This will help you create a consistent light cycle for your plants. Most grow tents come with a timer, but you can also purchase one separately. If you’re using multiple lights, you’ll need to connect each light to the timer separately.
5. Install Your Exhaust Fan and Carbon Filter
The next step is to install your exhaust fan and carbon filter. Start by attaching the exhaust fan to the grow tent frame, making sure the fan is pointing outwards. Next, attach the carbon filter to the exhaust fan. The carbon filter will help to remove any unwanted odors from your grow tent, ensuring a pleasant growing experience.

6. Set Up Your Thermometer and Hygrometer
The next step is to set up your thermometer and hygrometer. These devices will help you to monitor the temperature, and humidity levels inside your grow tent. Place the thermometer and hygrometer inside the grow tent and make sure they’re easily visible. Using a digital thermometer, you can place it on the grow tent floor.
7. Connect Your Exhaust Fan to the Timer
The next step is to connect your exhaust fan to the timer. This will ensure that your exhaust fan turns on and off correctly. Most grow tents come with a timer, but you can also purchase one separately. You’ll need to connect each fan to the timer if you’re using multiple fans.
8. Fill Your Grow Tent With Soil
The next step is to fill your grow tent with soil. You’ll need to purchase quality potting soil from a garden center or nursery. Fill the grow tent until the soil is level with the top of the frame. Make sure there are no gaps or holes in the soil. If you’re using multiple lights, you’ll need to fill the grow tent with soil before installing the lights. The final step is to install your grow lights. Hang the lights from the top of the grow tent frame using the provided hooks. Make sure the lights are evenly spaced and at the correct height. Once the lights are in place, plug them in and turn them on.
9. Plant Your Cannabis Seeds or Clones
The next step is to plant your cannabis seeds or clones. If you’re using seeds, you’ll need to germinate them before planting. Plant the seeds or clones in the soil and ensure they’re evenly spaced. Once the plants are in the soil, water them with a quality nutrient solution. If you’re using clones, you’ll need to water them with a rooting hormone before planting.

10. Monitor the Temperature and Humidity Levels
It’s important to monitor your grow tent’s temperature and humidity levels. The ideal temperature range for cannabis plants is 70-85 degrees Fahrenheit. The ideal humidity level is 40-60%. You can use a digital thermometer and hygrometer to monitor your grow tent’s temperature and humidity levels.
11. Ventilate Your Grow Tent
It’s important to ventilate your grow tent to prevent the build-up of heat and humidity. The best way to ventilate a grow tent is with an exhaust fan. Make sure the exhaust fan is connected to a timer, so it turns on and off at the correct times. If you’re using multiple lights, you’ll need to ventilate the grow tent more often.
12. Keep an Eye on Your Plants
It’s important to check on your plants regularly. Ensure they receive the correct amount of light, water, and nutrients. Watch for signs of stress, such as yellowing leaves or stunted growth. If you see any problems, address them immediately. Use a magnifying glass to inspect your plants for pests or diseases.
13. Clean Your Grow Tent Regularly
The last step of how to set up a grow tent with led lights is to keep it clean. It’s important to keep your grow tent clean. Dust and dirt can build up on the walls and floor of the grow tent over time. This can create a favorable environment for pests and diseases. Clean the walls and floor of the grow tent with a damp cloth or sponge. You can also use a grow tent cleaner to clean the walls and floor of the grow tent.

How Led Lights Helps In The Growth Of Plants:
1. Increased Efficiency
LEDs are much more efficient than traditional grow lights, such as HPS or MH lights. This means that they use less electricity to produce the same amount of light. This can save you a lot of money on your electric bill. So if you’re looking to save money on your electric bill, LEDs are the way to go.
2. Longer Lifespan
LEDs also have a longer lifespan than traditional grow lights. This means you won’t have to replace your LEDs as often as you would with HPS or MH lights. LEDs can last up to 50,000 hours, much longer than HPS or MH lights. However, it’s important to note that the lifespan of an LED will vary depending on the brand.
3. Less Heat
Another advantage of LEDs is that they produce less heat than traditional grow lights. This is because LEDs convert more energy into light and less energy into heat. This can help to keep your grow room cooler, which is important for the health of your plants.
4. No Noise
LEDs also don’t produce any noise, which is another advantage over traditional grow lights. This means that you won’t have to worry about the noise level in your grow room. LEDs are the way to go if you’re looking for a quiet grow room.
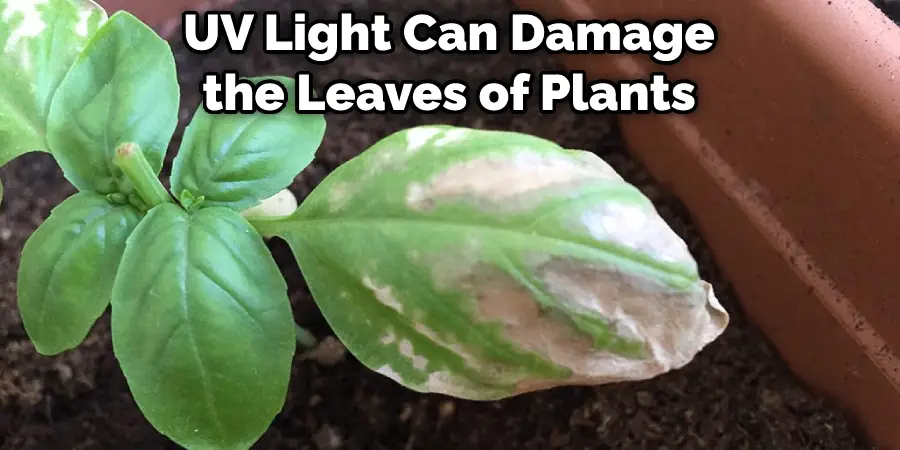
5. Safer for Plants
LEDs are also safer for plants than traditional grow lights. This is because LEDs emit very little UV light, which can harm plants. Traditional grow lights, such as HPS lights, emit a lot of UV light, which can damage the leaves of plants. It’s important to note that some LEDs emit a small amount of UV light. However, this is not enough to damage the leaves of plants.
6. Better for the Environment
LEDs are also better for the environment than traditional grow lights. This is because they contain no toxic materials, such as mercury. Mercury is a toxin that can be harmful to the environment. HPS and MH lights contain small amounts of mercury, which can be released into the environment when the lights are disposed of.
7. More Flexible
LEDs are also more flexible than traditional grow lights. This means you can change the color of the light you’re using. For example, you can use red LEDs for flowering and blue LEDs for vegetative growth. This flexibility can be helpful if you’re trying to achieve specific results with your plants.
8. Easier to Use
LEDs are also easier to use than traditional grow lights. This is because they’re easy to set up and take down. You won’t need to worry about hanging lights or adjusting them. LEDs can also be controlled with a timer, making your life easier. LEDs are the way to go if you’re looking for an easy-to-use grow light.
9. More Affordable
LEDs are also more affordable than traditional grow lights. This is because they’re more efficient and have a longer lifespan. You’ll save money in the long run by using LEDs. LEDs are the way to go if you’re looking for a more affordable grow light.
10. Better Quality of Light
LEDs also provide a better quality of light than traditional grow lights. This is because LEDs emit full-spectrum light, which is similar to sunlight. This type of light is better for plants than the light that’s emitted by HPS or MH lights. LEDs are the way to go if you’re looking for a grow light that will provide your plants with the best possible light.
Tips and Warnings on How to Set Up a Grow Tent With Led Lights:
Tips:
- Make sure you have the right grow light. Not all led lights are created equal; some emit more heat than others. The last thing you want is to fry your plants!
- Make sure you have good ventilation. This is key to keeping your grow tent cool and your plants healthy.
- Don’t forget to water your plants! They still need water even if they’re getting light from LEDs.
Warnings:
- Don’t put your led lights too close to your plants! They can get burned if they’re too close.
- Be careful of heat build-up. Led lights can get hot, so make sure you have good ventilation to keep your grow tent cool.
- Don’t forget to turn off your lights at night! Plants need a dark period to rest and rejuvenate.
Frequently Asked Questions
What Temp Should My Grow Room Be With Led Lights?
If you have a cold room or garage, it is best to keep your grow room at a temperature of 68-73 degrees Fahrenheit. If you have a warm environment (averaging 75-77 degrees), then raising the temperature to 83-86 F should work fine. However, if you have an indoor garden located in a very dry climate, then increasing the ambient temperature to 90+ degrees may be necessary in order for the plants to thrive.
Can You Have Too Much Led Light in a Grow Tent?
Unfortunately, there is no limit to the amount of led light that can be used in a grow tent. However, because this type of lighting emits radiation, it should only be used during specific periods when the plant is actively growing. Additionally, you should keep an eye on your plants and adjust their exposure accordingly if necessary.
How High Should My Grow Light Be From My Plants?
On one hand, you want your light to be high enough so that the plants get the direct sunlight they need to grow. On the other hand, you don’t want your light to be so high that it burns the plants. The best way to figure out what height is right for your plants is by trying different heights and seeing which gives you the best results. You can also check out online Grow Light calculators to help you get an idea of what height is best for your specific plants.
Can you grow big buds with LED lights?
Yes, you can grow big buds with LED lights. However, it is important to note that LEDs produce a harsher odor and taste than traditional growing methods such as soil or hydroponics. So if quality is your number one priority, then you may want to choose another method of cultivation. But overall, LED lighting does have its benefits in terms of increased yields and shorter crop times.
Conclusion:
If you want to start growing your cannabis, we hope that this article on how to set up a grow tent with led lights has helped provide some insight into the world of grow tents and LED lights. In addition, we’ve outlined what you need to know before making a purchase and how to set up your new tent. Remember, if you have any questions or run into any problems while setting up your grow tent, write down your questions here so that the community can help you out.