
Installing LED strips under cabinet lighting is a great way to improve the aesthetics and functionality of your kitchen. This guide will show you how to install LED strips under cabinet lighting. We will also provide tips on choosing the right strip lighting and controller.
By following these simple instructions, you can have your new lighting installed in no time. Then, with just a few tools and some patience, you’ll be able to create a well-lit workspace for all your cooking needs. Read on for more information!
Summary: If you’re looking for a way to add a little extra light to your kitchen or bath, installing LED under cabinet lighting is a great option. LEDs are energy-efficient and don’t require any special installation tools, so you can get them up and running in no time.

8 Advantages of Using Led Strip Under Cabinet Lighting:
1. Improve the Look of Your Kitchen:
Some people choose to put special lights under their kitchen cabinets to make them look nicer. There are many different colors of these lights, so people can pick the ones that look best with their cabinets. These lights also make kitchens look more modern and stylish.
2. Increased Functionality:
Under cabinet lighting not only improves the look of your kitchen, but also increases its functionality. With proper lighting, you’ll be able to see what you’re doing while you’re cooking, making food preparation tasks much easier.
3. Energy Efficiency:
LED strip lights are a great way to save energy and money. They use less electricity than other types of lighting, so they’ll save you money on your energy bill. An average cost for LED strip lights is $0.12 per foot, so they’ll save you a lot of money in the long run.
4. Long Lifespan:
LED strip lights can last up to 50,000 hours, much longer than incandescent or fluorescent bulbs, so you won’t have to replace your under cabinet lights as often. This is a great way to save money.

5. Low Maintenance:
LED strip lights are very low maintenance. They don’t require any special care or cleaning, and they last a very long time. So you can expect your LED strip lights to last for many years, making them a great investment.
6. Easy Installation:
Installing LED strip lights is not as difficult as it may seem. With some basic tools and supplies, you can easily install your new lights. We’ll show you how to do it in the next section.
7. Versatile Lighting:
LED strip lights are extremely versatile and can be used in a myriad of ways. For example, they can be used to accentuate certain features in your kitchen, or they can be used as general task lighting. You can also use them to create a unique and stylish ambiance for your kitchen.
8. Safety and Convenience:
LED strip lights are safe and convenient to use. They don’t produce any heat so they won’t pose a fire hazard. Additionally, they’re not as hot as other types of lighting, so you won’t have to worry about burning yourself. You can also find LED strip lights with Motion sensors and dimmer switches which are very convenient to use.
LED strip lights are available in many different colors. You can choose from white, blue, red, and green. You can also get them in a variety of lengths so that you can find the perfect one for your needs. There are also LED strip lights that have a waterproof feature which makes them ideal for use in damp places like basements or garages. Waterproof LED strip lights are ideal for use in bathroom because they won’t be damaged by water.

Now that we’ve gone over some of the advantages of using LED strips under cabinet lighting let’s look at how to install led strips under cabinet lighting.
You Can Check It Out to Use the Diy Button on Led Lights
Few Things to Consider Before Installing Led Strip Under Cabinet Lighting
Materials of the Cabinets:
Before installing LED strips under cabinet lighting, you’ll need to consider the material of your cabinets. If they’re made of metal, you’ll need to use a different type of tape than if they’re made of wood. Likewise, if the Cabinets are made of glass, you’ll need to use a different type of light.
The Size and Shape of the Cabinet:
The size and shape of the cabinet will also affect your decision on how to install the LED strip. If the cabinet is large, you’ll need more lights. If the cabinet is narrow, you might be able to get away with fewer lights.
The Color of the Cabinet:
The cabinet’s color will also play a role in choosing the right LED strip. If the cabinet is a light color, you’ll need a different type of light than if it’s a dark color. In addition, you need to choose the right color temperature so that the light will complement the cabinet.
The Finish of the Cabinet:
The finish of the cabinet is also an important consideration. If the cabinet has a glossy finish, you’ll need to be careful not to scratch it when installing the strips. If the cabinet is painted, you’ll need to be careful not to peel off any paint. If the cabinet is stained, you may need to use a different type of adhesive so that it doesn’t damage the finish.

The Length Between the Counter Surface:
You’ll also need to consider the length between the counter surface and the bottom of the cabinet. This will determine how long the strips need to be. You don’t want them to be too long or too short. So be sure to check the measurements before you purchase the strips.
Make Sure the Surface is Clean:
Before installing the LED strip, you’ll need to make sure the surface is clean. You don’t want any dirt or dust on the adhesive or the lights. So be sure to clean the surface with a mild cleaner before you begin.
Tools and Materials Needed
- LED strip lights
- Power supply
- Mounting tape or brackets
- Wireless remote
- Wireless controller
How to Install Led Strip Under Cabinet Lighting: Step by Step Guide
Step 1: Choose the Right Location.
The first step in installing your LED strip lights is to choose the right location. Next, you’ll need to decide where your lights are mounted. Keep in mind that under cabinet lighting is typically used to provide task lighting, so you’ll want to choose a location close to where you do most of your cooking.
Step 2: Measure the Area.
Once you’ve chosen the location for your LED strip lights, it’s time to measure the area. First, you’ll need to know the length and width of the area so that you can determine how much strip lighting you’ll need. You can also check the packaging of your LED strip lights to see how much coverage they provide.

Step 3: Clean the Area.
Before installing your LED strip lights, you’ll need to clean the area where they’ll be mounted. Use a damp cloth to remove any dust or debris from the surface. This will help ensure that your lights stick properly and don’t fall off.
Step 4: Choose the Right Strip Lights.
Now that you know the area’s measurements, you can choose the right strip lights. There are many different types and sizes of strip lights available, so it’s important to select those that will fit your space. You can also choose between different colors and brightness levels.
Step 5: Cut the Lights to Size.
Once you’ve selected the right strip lights, it’s time to cut them to size. Most LED strip lights come with a built-in cutting line, so you need to line up the strip light and cut along the line. If you see any loose wires, tuck them back into the strip light.
Step 6: Remove the Backing.
Once you’ve cut the strip lights to size, it’s time to remove the backing. This will expose the adhesive used to attach the lights to the surface. Be careful not to touch the adhesive as it can be very sticky.
Step 7: Attach the Lights.
Now it’s time to attach the lights to the surface. Start by peeling back a small section of the adhesive backing. Then, align the strip light in the desired location and press it into place. Continue peeling back the backing and attaching the strip light until you’ve covered the entire area.

Step 8: Connect the Lights.
Once your LED strip lights are in place, it’s time to connect them. Most strip lights come with a self-adhesive connector, so you need to line up the connector and press it into place. If your strip lights don’t have a self-adhesive connector, you can use wire ties or zip ties to secure the connection.
Step 9: Drill Holes Inside the Cabinet.
If you’re mounting your strip lights inside a cabinet, you’ll need to drill holes for the wires. First, drill two holes in the back of the cabinet, making sure that they’re large enough to accommodate the wires. Then, thread the wires through the holes and connect them to the power supply.
Step 10: Run the Wires Through the Holes.
Once you’ve drilled the holes, you can run the wires through them. Start by threading the positive wire through one of the holes and the negative wire through the other hole. Then, connect the wires to the power supply.
Step 11: Installing the Dimmer Inside Cabinet.
If you want to control the brightness of your LED strip lights, you’ll need to install a dimmer inside the cabinet. Start by drilling two holes in the back of the cabinet. Then, thread the dimmer wires through the holes and connect them to the power supply. Finally, attach the dimmer knob to the front of the cabinet.
Step 12: Wire the Power Supply with Dimmer.
To wire the power supply with the dimmer, connect the positive wire to the dimmer. Then, connect the negative wire to the power supply. Next, use a screwdriver to tighten the screws on the dimmer. Finally, connect the power supply to the wall outlet.
Step 13: Test the LED Strip.
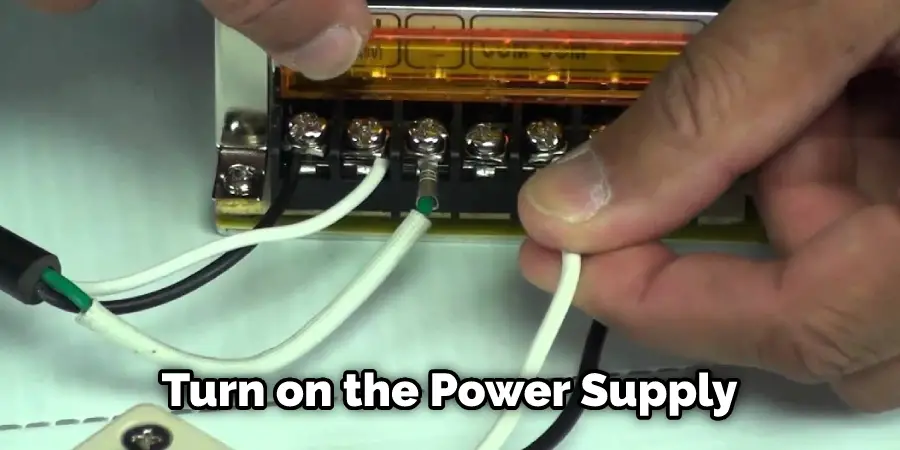
Once you’ve finished installing your LED strip lights, it’s time to test them. Turn on the power supply and use the dimmer knob to adjust the brightness. If everything is working properly, you should see a nice, even light coming from your strip lights. Congratulations, you’ve just installed LED strip lights under your cabinets!
What to Look for When Choosing Led Strip for Under Cabinet Lighting?
When it comes to choosing the right LED strip lights for under your cabinets, there are a few things you’ll need to keep in mind. First, you’ll need to know the area’s measurements so you can choose the right strip lights. There are many different types and sizes of strip lights available, so it’s important to select the ones that will fit your space.
Secondly, you’ll need to decide on the type of lighting you want. There are two main types of LED strip lights: warm white and cool white. Warm white is a more traditional light, while cool white is a more modern look. If you’re not sure which one you prefer, it’s good to try out both types to see which one you like best.
Frequently Asked Questions
Where Should Led Strip Lights Be Placed Under Cabinets?
One of the best places to place led strip lights under cabinets is at the edge of the countertop which will be closest to the dining table. This will allow you to light up all of your cabinet contents without having any harsh shadows or hotspots.
Can You Use Led Strip Lights Under Cabinets?
Yes, you can use LED strip lights under cabinets. However, be sure to measure the length of the light string before ordering so that it will fit correctly. You also need to make sure that the end caps are covered so that light doesn’t leak out and disturb your sleep.
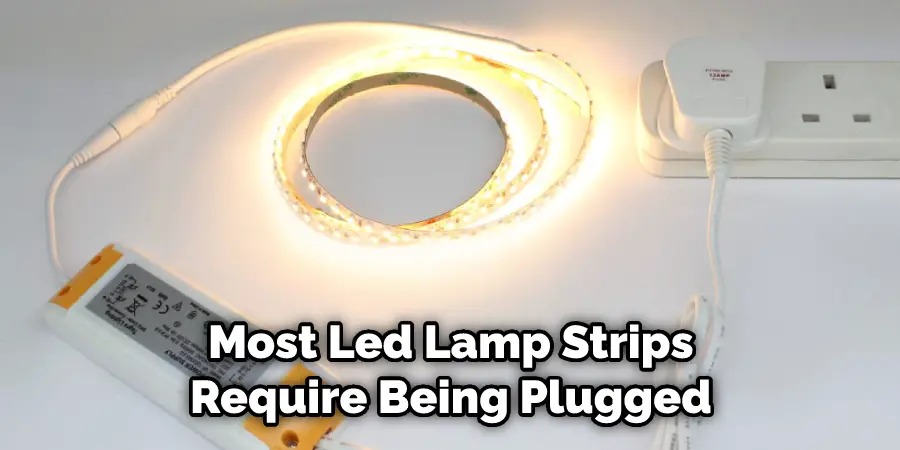
Do Led Strip Lights Need to Be Plugged in?
The answer to this question depends on the type of LED strip light that you have. Most LED strip lights that are designed to be used as ceiling lights or wall decorations do not require any installation – they just plug into an outlet and are ready to use.
If you have a LED strip light that is designed to be used as a lamp, the answer may be different. Most LED lamp strips require being plugged in in order for them to work properly. Some exceptions to this rule are dimmable LED lamp strips, which allow you to control the brightness of the light without having to plug them in.
Do Under Cabinet Led Lights Need a Transformer?
Yes, Under Cabinet LED Lights need a transformer in order to work properly. A transformer is used to change the voltage of an electrical wire from one range (usually 120 volts) to another range (usually 13.8 or 277 volts). This allowsUnder Cabinet LED Lights to function correctly and emit light.
Conclusion
Installing LED strip lighting under your cabinets is a great way to improve the look and feel of your kitchen. It adds light, but it also makes your kitchen appear more spacious. In this article, we’ve outlined the steps you need on how to install led strip under cabinet lighting in your kitchen.
By following the steps in this article, you should be able to install your new LED strip light with ease. We hope you find this information helpful and that it inspires you to update your home with some new LED lighting! Have fun and enjoy your brighter space!