Installing recessed lights in your home can be a great way to add extra illumination and energy efficiency to any room. Friction clips are one of the most convenient and efficient methods for installing these lights. These nifty little clips allow you to easily and securely fasten your recessed lighting system to the ceiling, resulting in a smooth, seamless appearance.

If you’re thinking about adding recessed lights to your home, here are a few steps to help guide you through the process of installing them with friction clips. While there are many ways to install them, one of the easiest methods is by using friction clips. This guide will show you how to install recessed lights with friction clips in just a few simple steps.
Summary: Installing recessed lights can be a daunting task, but with the right tools and tips, it’s a quick and easy process. Follow these simple steps to install recessed lights with friction clips: 1. Remove the old light fixture. 2. Mark the location of the new light fixture on the wall. 3. Install the new light fixture using the included friction clips. 4. Reverse the installation process for the old light fixture.
Step by Step Processes for How to Install Recessed Lights With Friction Clips
Step 1: Disconnect the Power Cut
Before starting any installation, always make sure to turn off the power at your circuit breaker. This will ensure safety during the installation process.
Step 2: Torsion-clip Mount (12w, 18w & 24w)
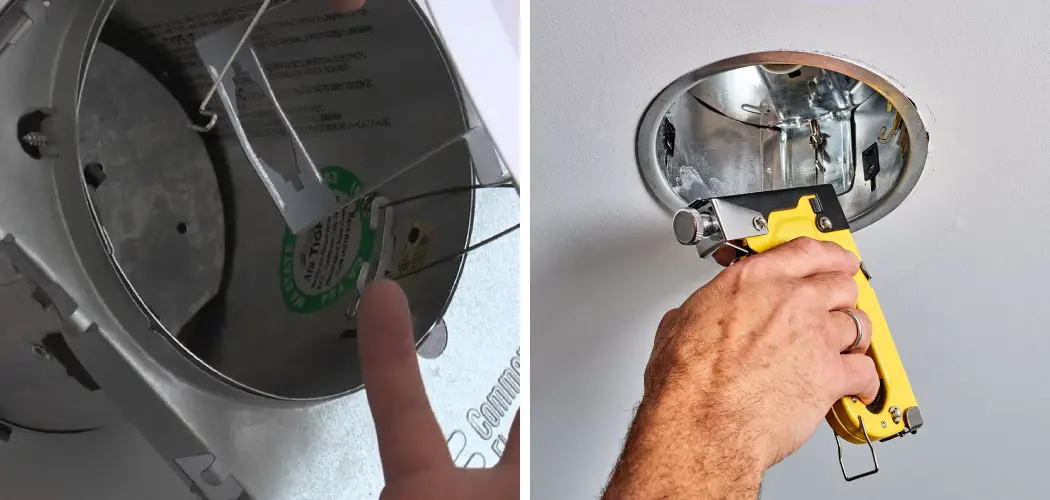
Using a screwdriver, loosen the three screws on the torsion clip and slide it onto the housing of your recessed light. Some recessed lights may require a J-box adapter for proper installation. If your recessed light requires one, simply attach it to the housing before moving on to the next step.
Using a drill, create a hole in the ceiling where you want your recessed light to go. Place the recessed light into this hole and twist it until it locks into place. Slide the friction clip onto the housing of your recessed light, making sure that it is centered. Tighten the screws on the clip using a screwdriver, ensuring that it is securely fastened to the ceiling.
Step 3: Fixture Mount
If your recessed light has a fixture mount, simply follow the steps above to attach the friction clip to the housing and secure it to the ceiling.
Step 4: Drywall Spring-clip Mount All Models
If your recessed light has a drywall spring-clip mount, use a screwdriver to loosen the screws and attach them to the housing. Place the recessed light on the desired ceiling spot and push it in until it clicks into place. Slide the friction clip onto the housing of your recessed light, making sure that it is centered. Tighten the screws on the clip using a screwdriver, ensuring that it is securely fastened to the ceiling.
After your recessed lights are securely mounted, you can now connect the wiring. Make sure to match up the proper wires – black to black and white or neutral to white. Use wire nuts to secure the connections, and cover them with electrical tape for added safety.
Step 5: Surface Mount-all Models
If your recessed light has a surface mount, simply attach the friction clip onto the housing using a screwdriver and fasten it to the ceiling. Connect the wiring described above before turning on the power at your circuit breaker and testing your new lights.
Step 6: Switch Power Back on
After double-checking all the connections and ensuring that everything is securely fastened, you can turn the power back on at your circuit breaker. Test out your new recessed lights to ensure they are working properly.
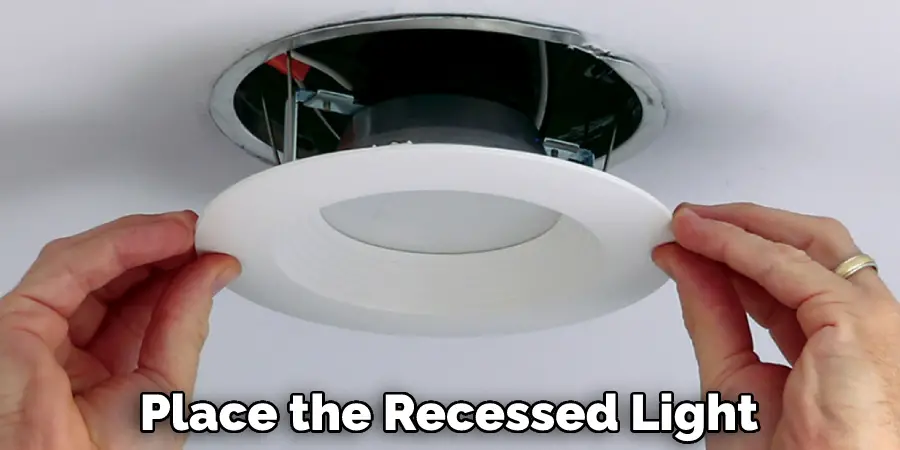
Step 7: Trim-ring Installation (Optional)
You can also install trim rings onto your recessed lights for added aesthetic appeal. Place the trim ring onto the housing and twist it until it clicks into place. Simply slide them onto the housing and secure them with screws using a screwdriver.
Step 8: Test and Enjoy
Finally, turn on the power at your circuit breaker and test out your newly installed recessed lights. Sit back and enjoy the added illumination and modern look that these lights bring to any room
How Do You Keep Your Recessed Light From Falling Out?
To keep your recessed lights from falling out, you need to follow a few key steps:
- Make sure that all your light fixtures are installed using friction clips, which securely hold the lights in place without needing screws or other hardware.
- Before installing new lighting, You should measure the dimensions of each fixture to ensure that it fits snugly within the space.
- After switching on the power, You have to check periodically to ensure that everything is still in place and securely fastened.
By following these simple steps, You can keep your recessed lights from falling out and protect your home from potential electrical hazards.

How Many Recessed Lights Can You Pull on One Switch?
When it comes to installing recessed lights, there are several considerations to consider. One of the most important things to consider is how many recessed lights you can fit on one switch, particularly if you use friction clips.
A few factors can influence this, such as the design and size of your lights, as well as the overall layout of your room. Generally speaking, however, most people find that under three or four recessed lights work best when installed with friction clips. This allows you to easily control them all from a single switch while still maintaining full visibility in the room.
To install recessed lights with friction clips, start by measuring and marking out where each light will go on the surface of your ceiling. If necessary, make any adjustments to ensure that each light is properly centered within its designated space. Once this is done, carefully drill holes for both the light fixture and the clip itself in each specified spot.
How Far Off the Wall Should Recessed Lights Be?
When it comes to installing recessed lights, one of the most important factors to consider is how far off the wall they should be. This will depend on several variables, such as the size and shape of the room and the type of mounting hardware being used. One popular method is to use friction clips, which involve attaching thin metal arms to either side of a light fixture. These are then twisted into place against the drywall to secure the light against the wall.
However, for this method to work effectively, the distance between each clip must be carefully measured so that there is just enough space left between them and the wall. Ultimately, there is no one-size-fits-all answer regarding setting off lights by a certain distance. While different configurations may be optimal for certain setups or spaces, there is also a wide range of personal preferences and lighting needs that will determine how far off the wall luminaires need to be for the best results.
In any case, whether you’re using friction clips or another mounting hardware system, ensuring that your lights are properly set back from any walls can help you achieve optimal lighting without sacrificing aesthetics or function.

Few Precautions When Installing Recessed Lights With Friction Clips
- Make sure to turn off the power before beginning the installation
- Double-check measurements before drilling holes to ensure proper fit
- Use caution when twisting friction clips into place to avoid damaging drywall or light fixtures
- Regularly inspect recessed lights to ensure they are securely fastened and not at risk of falling out. Only use recessed lights that are rated for the appropriate wattage and electrical requirements of your home.
- Seek professional help if you are uncertain about any installation aspect or unsure how to complete it safely.
- Follow the local and regional building codes for installing recessed lights.
- Always follow safety precautions and use caution when working with electricity.
- Ensure electric shock protection systems, such as ground fault circuit interrupters, are properly installed and functioning.
- Never exceed the maximum wattage requirements for your light fixtures and electrical system. Doing so can lead to dangerous overloading and fire hazards.
Frequently Asked Questions
What is the Difference Between Can Lights and Recessed Lights?
When it comes to recessed lights, you are able to choose the light fixture that best suits your needs. You can have a flush mount light or a recessed light. A flush mount light is a light that is mounted flush against the wall and usually has a round or rectangular shape. A recessed light is a light that is placed behind the wall and has a rectangular or oval shape.
When it comes to can lights, you are limited in terms of what you can do with them. Can lights come in different shapes and sizes, but they all have one common feature- they are made out of cans. There are many different ways to use can lights, but the most popular way to use them is as lamps.
Where Should You Not Put Recessed Lights?
The placement and design of recessed lights will vary depending on the specific needs of your home. However, some general guidelines for avoiding placement mistakes with recessed lights include:
- Avoid placing recessed lights near windows or doors, as these areas are often the most visible and vulnerable parts of a home.
- avoid placing recessed lights in direct sunlight or near any areas that receive a lot of direct sunlight, such as the front and back of a home.
- be careful not to place recessed lights too close to the ceiling, as this can lead to unwanted shadows and glare.
- be sure to measure the distance between each recessed light and the surrounding wall before selecting the correct fixture size.
- always use caution when installing recessed lights, as they can easily cause injury if not installed correctly. If you have any questions or concerns about installing or using recessed lights in your home, consult an experienced professional who can help you make the right decisions for your specific situation.
Are Recessed Lighting Outdated?
The use of recessed lighting depends on the specific requirements of a given space. However, in general, recessed lighting is often seen as outdated and out of date due to its low profile and lack of versatility. These days, many homeowners prefer more contemporary lighting solutions that are easier to update and manage.
Do Led Recessed Lights Use Less Electricity?
Yes, LED recessed lights use less electricity than traditional incandescent or halogen recessed lights. LED recessed lights are made up of individual LEDs, which consume far less energy than traditional light bulbs. In fact, an LED recessed light may only use as much electricity as a standard light bulb when in use. Moreover, LED recessed lights do not contain any mercury, so they are environmentally friendly and safe to use.
Conclusion
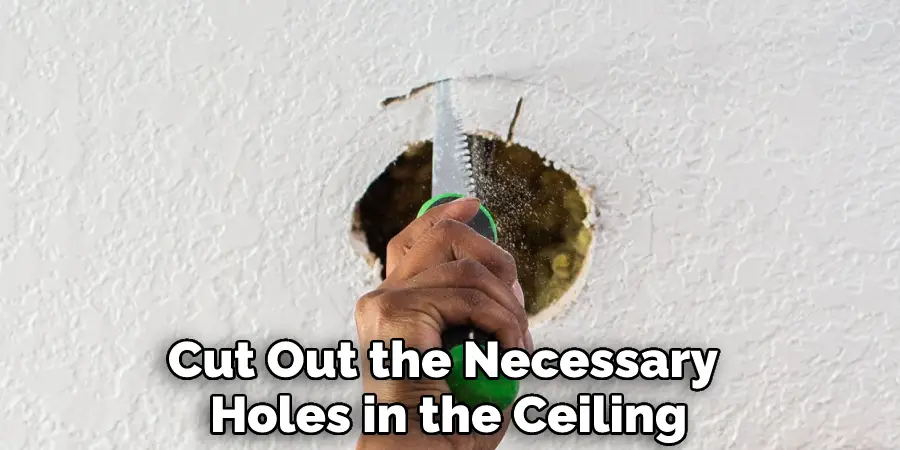
Installing recessed lights with friction clips is a great way to brighten up any room or space. You always try to choose the lights that are right for your project: there are many different types and sizes available, so it’s important to know what functionality and style you’re looking for. Once you have selected your lights, the next is to carefully cut out the necessary holes in the ceiling or wall. Depending on the surface material, this can be done using various tools, including a utility knife or jigsaw.
Once the holes have been cut, you will need to attach your lights to the screws or anchors that are already installed in your ceiling or wall. You will need to attach the clips holding your lights in place and providing friction against the ceiling or wall. We hope this article has been beneficial in learning how to install recessed lights with friction clips. Always try to ensure the steps discussed here are followed chronologically. Make sure the precautionary measures are followed.