Installing a Ring Floodlight Cam without existing wiring gives you many benefits. First, it eliminates the need for expensive installation and rewiring costs. Additionally, it lets you set up your security system in any area of your home that may not be wired with existing wiring. The installation also gives you more control over the lighting and camera placement.
One of the great advantages of installing a Ring Floodlight Cam without existing wiring is cost savings. Installation can be done in less than an hour, eliminating the need for rewiring or drilling holes in walls for running wires.
This type of installation also does not require professional assistance, making it a viable option for homeowners on a budget who want to take advantage of the advanced features offered by the Ring Floodlight Cam. In this blog post, You will learn how to install ring floodlight cam without existing wiring.
Step by Step Processes for How to Install Ring Floodlight Cam Without Existing Wiring
Step 1: Inspect the Area
Be sure to make sure the area in which you plan on installing your Ring floodlight cam is suitable for mounting and that there are no obstacles like trees or overhangs that could block the camera’s line of sight. Ensure you have all the necessary tools for installation, including a drill, screws, wire cutters, and a screwdriver.
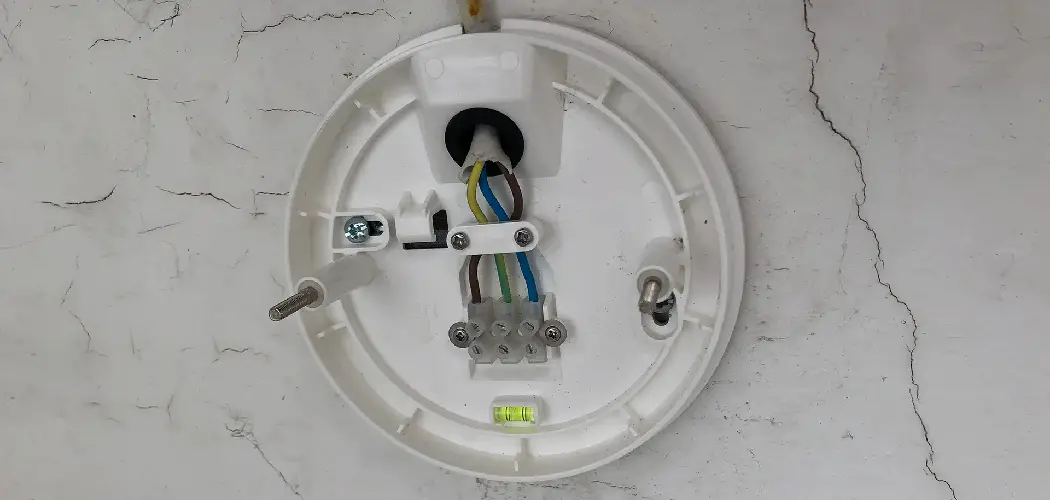
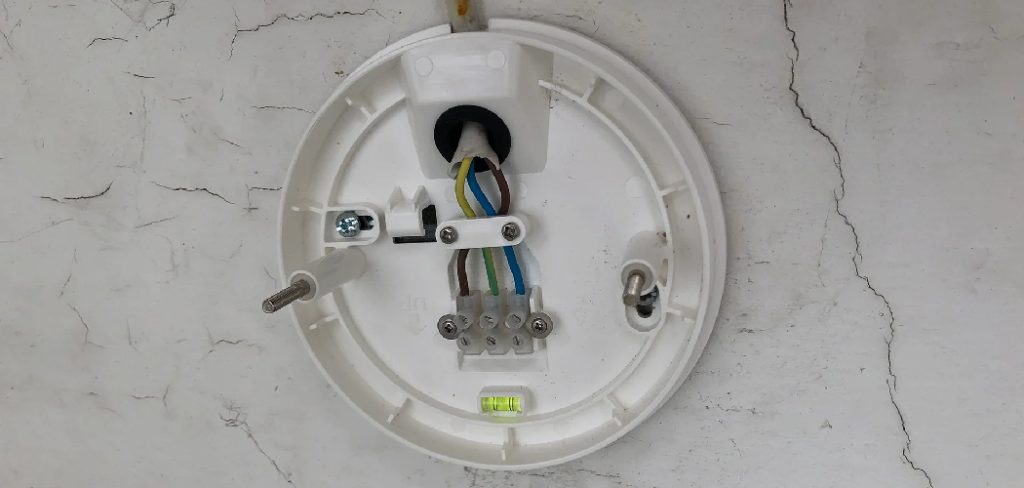
Step 2: Attach the Mounting Bracket to the Wall
Using your drill, attach the mounting bracket to the wall or other appropriate surface using the screws provided with your Ring floodlight cam package. Be sure to follow any included instructions regarding the placement of the bracket.
Step 4: Connect Wiring For Power Source
Connect one end to the power source and the other to your Ring floodlight cam using the provided wiring. Be sure to follow all included instructions regarding electrical wiring. Once you’ve securely attached the mounting bracket to the wall, attach your camera using the screws provided with the package. Again, make sure to read any included instructions regarding the camera placement.
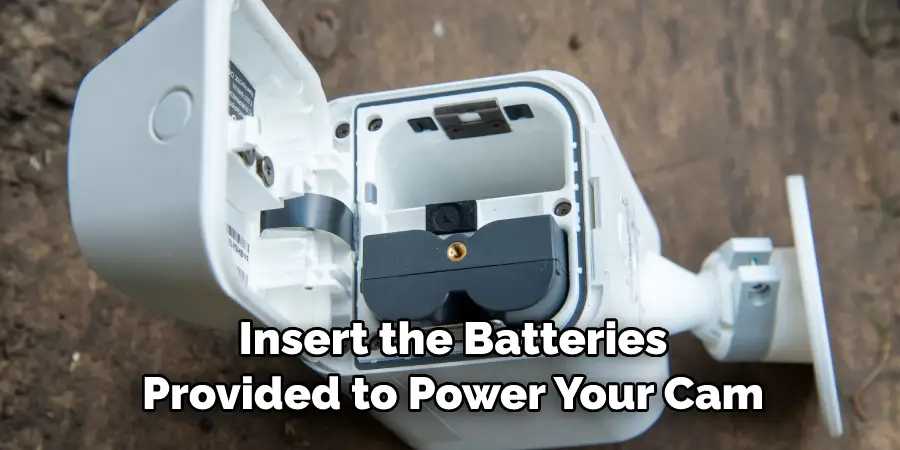
Step 5: Insert Batteries Into Your Camera
Once your camera is securely mounted, insert the batteries provided in the package to power your Ring floodlight cam. Be sure to follow all included instructions regarding charging and battery replacement. Utilize the Ring app on your smartphone to connect your Ring floodlight cam to the app. This will allow you to control your camera and review recorded footage from your phone.
Step 6: Test The Camera
Before installing your Ring floodlight cam, take some time to test out all its features and functions to ensure it’s working properly. Once you’ve tested the camera and ensured it’s working properly, finish installing your Ring floodlight cam by closing any exposed wiring. Be sure to follow all included instructions regarding installation and safety measures.
Now that your Ring floodlight cam is installed and functioning correctly, you can enjoy the safety and security of having a dependable home security system. By following these steps, you’ll be able to ensure the optimal performance of your Ring floodlight cam and have peace of mind knowing your home is secure.
Safety Tips for How to Install Ring Floodlight Cam Without Existing Wiring
- Ensure you know local laws and regulations before beginning the installation process. This will help ensure that your Ring Floodlight Cam complies with all legal requirements in your area.
- Read all of the documentation included with your Ring Floodlight Cam before starting the installation process to understand the components and safety measures that need to be taken.
- When it comes time to mount the floodlight cam, use a sturdy wall, post or other secure surface that is appropriate for the weight of your Floodlight Cam and any additional hardware used in its installation.
- If you’re using an extension cord, make sure it is rated to handle the wattage requirements of the Floodlight Cam.
- Keep an eye out for exposed live wires and make sure to turn off the power before beginning any installation. Make sure all connections are secure and double-check them once they’re done.
- If you come across any problems during the installation process, it is best to consult a professional electrician for assistance.
- Finally, test your installation before you leave the area to make sure everything is properly connected and operating correctly.

Following these safety tips will help ensure that your Ring Floodlight Cam is installed safely and securely without any existing wiring so that you can enjoy its many benefits.
How Do You Set Up Your Wifi Connection for the Device?
After the physical installation is complete, it’s time to set up the Wi-Fi connection. This can be done through the Ring app on your mobile device. Make sure you have that downloaded and installed first. Once you open the app, select ‘Set Up a Device’ from the main menu.
You will then be taken to a list of compatible Ring devices. Select ‘Floodlight Cam’ from the list and follow the instructions on screen. When you get to the Wi-Fi connection page, select your home network and enter its password.
Once connected, the app will ask you to name your device (i.e., Floodlight Cam) and create a unique motion zone to monitor. Again, follow the instructions on screen and your Floodlight Cam will be connected with your Wi-Fi network in no time! After that, you can start using your device right away.
Are There Any Recommended Maintenance Tasks That You Should Perform Regularly?
Yes. Regular maintenance is recommended to ensure that your Ring Floodlight Cam continues to operate at its best. These are a few routine tasks that you should perform:
- Check the power supply of the camera regularly—make sure it’s connected securely and firmly plugged into an outlet.
- Clean any dust or debris from the lens or camera body.
- Keep an eye on your Ring Floodlight Cam’s battery life and replace the batteries when necessary.
- Make sure that your internet connection is stable and fast enough to support streaming video from the camera.
- Review the settings of your Ring Floodlight Camera regularly to ensure they are up to date and configured correctly.

By performing these regular maintenance tasks, you can ensure that your Ring Floodlight Cam continues to function optimally without existing wiring. Additionally, if any problems arise with the camera or its connections, you will be able to identify and address them quickly.
How Often Should You Check for New Updates or Firmware Versions?
It is recommended that you check for new updates or firmware versions on your Ring Floodlight Cam every month. This ensures that you have the latest version available and are able to benefit from any bug fixes or enhancements. To do this, open the Ring app on your phone and select “Account Settings” from the menu.
Once there, select “Device Updates” and then select “Check for Updates.” If a new version is available, you will be prompted to install it. After the update is complete, your Ring Floodlight Cam will automatically begin using the updated firmware.
It is also important to regularly check for any new updates or firmware versions on the Ring app itself. This will ensure that you are receiving the best experience from your Ring Floodlight Cam, as well as being alerted to any new features that may be available. To do this, simply open the app and look for a “Check for Updates” button at the bottom of the screen. Click this and follow the instructions to ensure that you are running the latest version of the Ring app.
Are There Any Important Precautions You Should Take When Storing or Transporting the Device?
When storing or transporting the Ring Floodlight Cam, there are several precautions you should take to ensure it is not damaged.
First, make sure to store your device in a dry place away from extreme temperatures and direct sunlight. This will protect the device from being exposed to moisture which could lead to corrosion and reduce its lifespan. Additionally, if you have multiple devices, store them at least 3 feet apart to reduce the chance of interference.
When transporting the device, it’s important that you use a static-safe bag, and place the camera in an upright position. This will help prevent any damage caused by static electricity when moving the device around. Lastly, avoid dropping or mishandling your device as this could cause irreparable damage.

Following these precautions will help ensure your Ring Floodlight Cam is safe and in optimal working condition. With the right storage and transportation measures, you can confidently install your device and enjoy its many features without worry.
Conclusion
In conclusion, installing a Ring Floodlight Cam without existing wiring is a relatively straightforward process. With the help of the right tools and supplies, anyone can install the camera quickly and efficiently. In addition to following these steps, make sure to check your local laws regarding outdoor cameras before you install anything.
By taking the time to do some research ahead of time, you can ensure that your installation is done safely and legally. With the right equipment and steps, you can easily install a Ring Floodlight Cam without existing wiring. I hope this article has been beneficial for learning how to install ring floodlight cam without existing wiring. Make Sure the precautionary measures are followed chronologically.
You Can Check It Out to Remove Flood Light Cover