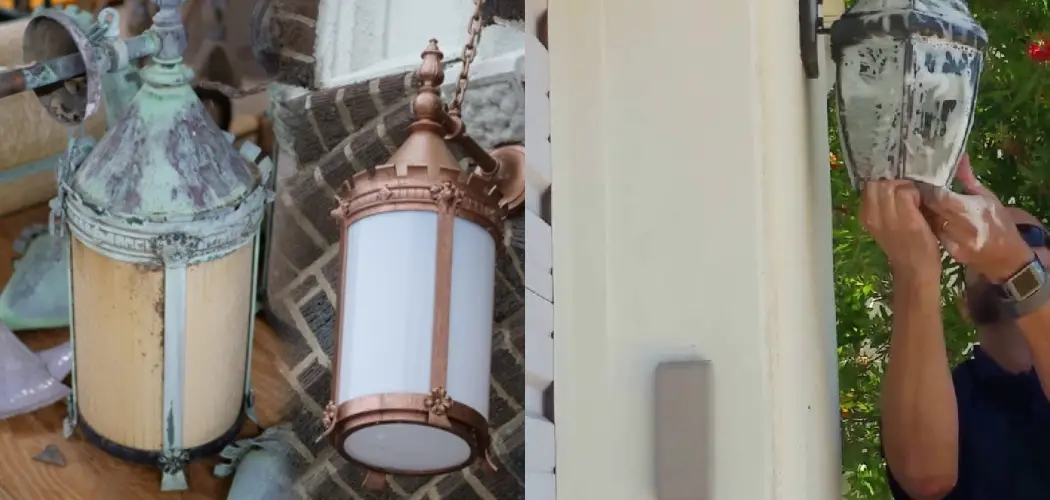
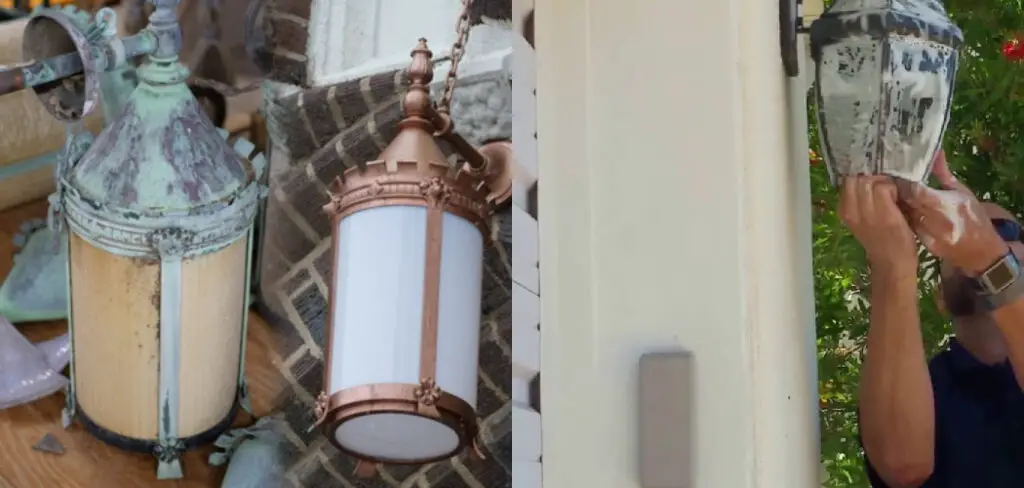
Cleaning your outdoor lights is an essential part of maintaining your home’s appearance and safety. Unfortunately, while it may be easy to forget about them during the colder months, oxidized lights can be a real eyesore. In this article, we will give you tips on how to clean oxidized outdoor lights and restore their shine. Keep reading to learn more.
Outdoor lights are particularly prone to oxidization due to exposure to the elements. This can lead to unsightly build-up on the surface of your lights, which can affect both their appearance and functionality. Unfortunately, many people think that the only way to remove oxidization is to replace the light entirely. However, this is not the case. With a little elbow grease and the right products, you can easily clean your outdoor lights and get them looking new again.
Summary: If your outdoor lights are showing signs of oxidation, there are a few steps you can take to restore their shine. First, pour a pot of boiling water onto the light and turn off the power. After a few minutes, use a hose to clean the light with a solution of white vinegar and water. Finally, dry the light off and replace the bulb.
What is an Oxidized Outdoor Light?
An oxidized outdoor light is a light fixture that uses oxidation to produce light. Oxidation is a chemical reaction that produces oxygen, and this oxygen can be used to create light. This type of light is usually used in outdoor lighting fixtures, such as streetlights and floodlights. Oxidized outdoor lights are more energy-efficient than traditional light sources and produce less heat. However, oxidized outdoor lights can have a shorter lifespan than other light sources.
If you’re looking for a more creative way to light up your outdoor spaces, consider using oxidized outdoor lights. These lights are extremely durable and long-lasting, making them ideal for areas that experience frequent rain or snow. Plus, they offer a unique look that will add personality to your outdoor areas.
Oxidized outdoor lights are a great way to brighten up any outdoor space. They provide bright, even illumination that can help improve visibility in any outdoor space. Additionally, they are easy to install and require minimal upkeep over time. If you’re looking for high-quality outdoor lighting solutions, consider using oxidized outdoor lights to illuminate your home or garden.
Tools and Materials
- Pliers
- Ladder
- Painter’s tape
- Glass cleaner
- Detergent
- Liquid metal cleaner and polisher
- Newspaper
- Paper towel
- Soft rags and cloths
- Scrub brush
- Sanding sponge
- Razor scraper
A Step by Step Guide on How to Clean Oxidized Outdoor Lights
Step 1: Turn Off the Power
The first step in any cleaning project is to turn off the power. In this case, you’ll need to find your outdoor light’s breaker and switch it to the “off” position. This will ensure that you don’t accidentally electrocute yourself while cleaning.
The breaker is typically located either on the side or back of your home, usually near the outside electrical panel. You may need to remove a cover plate hiding it from view to access it.
Step 2: Set Up Your Ladder and Remove the Light Bulb
Once the power is off, it’s time to set up your ladder. You’ll need to be able to reach the top of the outdoor light to remove the light bulb. Turn on your ladder and climb up to the spot where you need to change the light bulb. Once you’re there, be sure to turn off the power to the outdoor light again.
Be careful when you are using a ladder. Make sure that the ground is level and that someone is holding the ladder steady before you start to climb. If you don’t have anyone to help you, you can tie the ladder to nearby trees or posts so that it doesn’t move.
To remove the light bulb from its socket, first secure your ladder. Then, using a screwdriver or other small tool, carefully remove the bulb by its base. Be careful not to touch the glass, as this could damage the bulb.
Step 3: Release the Light
With the light bulb removed, you should now see the wires coming out of the top of the light. These wires are connected to a wall box mounted on the exterior of your home.
To release the light from the wall box, you’ll need to use a screwdriver or other small tool to loosen the screws holding it in place. Once the screws are loose, you can carefully pull the light away from the wall.
Step 4: Move the Light to a Stable Work Area
With the light released from the wall, you can carefully lower it down to a stable work area. Again, a table or countertop will work perfectly for this.
Once you have the light stable, you can begin disassembling it. Start by removing any glass or plastic covers that are protecting the lightbulb. These can usually be unscrewed by hand.
Step 5: Get Some Newspaper
Suppose you use a ball of newspaper or other material and stuff the light bulb socket to prevent small parts from falling inside. You’ll also want to cover your work area with newspapers or other materials to protect it from any dirt or debris that may come loose during cleaning.

Step 6: Clean the Exterior Glass
The first step in cleaning the exterior of your light is to remove any dirt, dust, or debris that may have accumulated on it. This can be done by wiping it down with a damp cloth or using a vacuum with a soft brush attachment.
Once the light is free of dirt and dust, you can begin cleaning the glass. Start by spraying it with a glass cleaner and wiping it down with a clean cloth. If there are any stubborn stains or spots, you can use a razor scraper to remove them.
Be sure to clean both the inside and outside of the glass, as this will help ensure that your light looks its best.
Step 7: Apply Painter’s Tape
Once the exterior glass has been cleaned, you can begin working on the metal surface. Using painter’s tape and a small piece of newspaper, cover any areas that you don’t want to get scratched or damaged during cleaning.
Step 8: Clean and Polish the Metal Surface
According to the package instructions, you’ll need to mix some liquid metal cleaner with water to clean your light’s metal surface. Then, use a soft cloth or scrub brush to apply this mixture to the metal surface in small, circular motions.
Once thoroughly applied, the mixture and any stubborn stains or debris are removed; you can use a fine-grit sanding sponge to polish it. Continue polishing until all signs of oxidation are gone from your outdoor light.
Step 9: Sand the Exterior Light
If your light has any severely oxidized areas, you may need to sand it down before cleaning. To do this, you’ll need to use medium-grit sandpaper and gently sand the affected areas.
Be sure only to sand the oxidized areas and avoid any areas that are not. Once you have finished sanding, you can vacuum up any dust or debris that has been generated.
Step 10: Apply a Clear Coat
After cleaning and polishing your outdoor light, it’s essential to apply a clear coat to protect it from future oxidation. This can be done with a can of clear enamel spray paint or by using a brush-on clear coat sealer.
Be sure to thoroughly let the clear coat dry before re-installing your light on your home. Your outdoor lights will now be clean, polished, and protected from future oxidation!
Step 11: Remove Painters Tape and Newspaper
Once your light is dry and ready to use, you can carefully remove the painter’s tape and newspaper that you used during the cleaning. This will allow you to safely re-install your light on your home without any damage or debris getting in the way.
Step 12: Re-Installing Your Light
Now that your light is clean, polished, and protected from oxidation, you can re-install it in your home. Start by screwing the glass or plastic cover back in place. Once this is done, you can carefully lift your light back up to its original position on the wall.
Be cautious when doing this, as you don’t want to drop or damage your newly cleaned outdoor light!
Check if your light is working correctly and enjoy its clean, polished, and protected exterior. With these steps on how to clean oxidized outdoor lights, you can easily keep your outdoor lights looking their best for years!
You Can Check It Out to Have Outdoor Lights Without an Outlet

Tips and Warnings:
Tips:
- Use a toothbrush to scrub any difficult areas to reach with a cloth.
- If the lights are extremely dirty, you may need to use a mild soap and water solution.
- Be sure to rinse the lights thoroughly after cleaning them with soap and water.
- Dry the lights entirely before storing or using them again.
- It is best to clean your outdoor lights regularly to prevent them from becoming too dirty or oxidized.
Warnings:
- Never use harsh chemicals or abrasive materials to clean your outdoor lights, which can damage the finish.
- Be careful not to get any cleaner on the light bulb, as this can cause the bulb to break.
- If you are unsure about how to clean your outdoor lights, contact a professional for assistance.
Whether you are looking to spruce up your outdoor lighting for special occasions or keep them in good condition year-round, cleaning oxidized outdoor lights can be an easy and effective way.
Frequently Asked Questions
Can You Refinish Outdoor Light Fixtures?
Yes, you can refinish outdoor light fixtures. By doing this, you can add a new look and enhanced functionality to your lighting system. There are many different options available when it comes to refitting outdoor light fixtures, so be sure to choose the one that is best suited for your needs. Some of the most popular choices include LED lights, halogen bulbs, or chandeliers/fans.
When choosing a replacement bulb or fixture, be sure to select one that offers similar brightness and performance as the original item. Additionally, make sure to check out our selection of porch lights if you’re looking for an affordable way to decorate your home or office at night!
Can You Use Toothpaste to Clean Brass?
It depends on the type of brass and toothpaste you are using. Some people believe that toothpaste can actually damage brass if used excessively, while others say that a light coat of toothpaste can be used to clean brass without any harm. Ultimately, it is best to test a small amount of toothpaste on a scrap of brass before using it on a larger area.
Conclusion
Outdoor lights can become oxidized and covered in dirt and dust, diminishing their appearance and function. Cleaning outdoor lights is a quick and easy process that can be done using household items. By following these simple steps on how to clean oxidized outdoor lights, you can restore your outdoor lighting to its original condition.