
A star ceiling is a beautiful and immersive way to bring a little bit of the magic of the night sky into your home. To create one, you will need a blank or white ceiling, acrylic paint in various shades of blue, and plenty of patience and attention to detail.
There is something undeniably magical about star ceilings. Maybe it’s the sense of wonder they evoke or how they make you feel like you’re a part of infinite space. If you’ve ever wanted to create one in your own home, you will let it know how to make a star ceiling using affordable and easy-to-find materials by following some steps.
Summary: Making a star ceiling is easy and can be done in just a few hours. All you need is some sturdy construction materials, a drill, and some hot glue. Start by drilling a few holes in the ceiling above where you want your stars to hang. Then, use hot glue to attach small pieces of cardboard to the holes. This will create the illusion of stars. Finally, hot glue larger pieces of cardboard to the top of the stars to create the perfect ceiling finish.

A Details Stepwise Guide on How to Make a Star Ceiling
Step 1: Prepare the Materials
You have to buy the following material from any local store or online.
- Styrofoam ceiling tiles
- LED lights (in star shape)
- Glue or adhesive tape
- Scissors or knife
- Paint or glitter for added decoration
Step 2: Trim Your Panels to Size
Using your scissors or knife, trim your Styrofoam panels to fit the dimensions of your ceiling. Make sure to measure and mark beforehand for accuracy. Decide on the pattern and placement of your LED lights on the panel. You can create constellations or scatter them randomly.
Step 3: Wrap the Panels With Felt
Cut out felt the same size as your trimmed panels, and use glue or adhesive tape to wrap the Styrofoam panel. This will give a cleaner appearance and also protect the panel from damage.
Using glue or adhesive tape, attach your LED lights to the wrapped panel according to your desired pattern or placement. For added decoration, you can paint the felt or sprinkle glitter on top before attaching your LED lights.
Step 4: Place LED Lights
Securely attach your finished panels to the ceiling using adhesive tape, glue, or nails. Turn on the lights to see your starry sky come to life! You can add more panels or swap designs to change the look whenever you want.
Step 5: Separate Your Standards Into Bundle
Separating your LED lights into bundle groups will allow for easy replacement of any burned-out bulbs. To do this, simply twist and wrap small light sections together with electrical tape. This will also make turning your star ceiling on and off in different sections easier as well.
Step 6: Install the Fiber Optics
To create a more dynamic and realistic starry sky, you can also add fiber optic strands on top of your LED lights. First, use a pencil or marker to mark where you want the strands on the ceiling. Then poke holes through the marked spots using a pushpin or thumbtack.
Insert the fiber optics into the holes and secure them with glue or adhesive tape. Turn on the fiber optic lights to see a twinkling night sky come to life above you.

Step 7: Hang Your Panels
Securely attach your finished panels to the ceiling using adhesive tape, glue, or nails. Turn on the lights to see your starry sky come to life! You can add more panels or swap designs to change your look.
Step 8: Connect Your Standard Ends
Using wire connectors, connect the ends of your LED light bundles to your power source, ensuring they are turned off. Test each section before fully turning on to ensure they all work properly.
Step 9: Treat the Panels With Fire Retardant
Treat the panels with fire retardant spray or solution to keep your star ceiling safe. This will help prevent any accidents and keep your ceiling looking beautiful for years to come.
Step 10: Enjoy Your Place Under the Stars
Sit back, relax, and enjoy the beauty of your very own star ceiling. Create a cozy space to stargaze or set the mood for a romantic evening under the twinkling lights. The possibilities are endless with your DIY star ceiling!
Important Safety Guidance
Before starting on this project, it is important to follow safety guidelines and precautions. Ensure the area you will be working in is well-ventilated, as some materials used may have strong doors or fumes.
- Wear appropriate protective gear, such as gloves and goggles, to protect yourself from potential harm.
- Ensure that any power tools or equipment are in good working condition and properly handled.
- Have a fire extinguisher nearby in case of emergency.
- Have a plan for where to dispose of materials and debris once the project is completed.
- Follow all label instructions for materials used, and consult a professional for guidance if in doubt.
- Cut the foam board or plywood into your desired shape and size using a power saw or hand saw.
- Paint or wallpaper the base to create the background for your star design.
- Arrange and adhere to the fiber optic lights or LED lights to create the twinkling star effect.
- Use a dimmer switch to control the brightness of your star ceiling design.

Which Starlight Kit Should I Choose From the Product Range?
Choosing the right starlight kit for your star ceiling project depends on a few factors, including the room’s size and your desired brightness level. Our Basic Star Kit is perfect for smaller rooms or those looking for a more subtle twinkle effect.
For larger rooms or a brighter shine, consider upgrading to our Deluxe Star Kit. Additionally, think about the look you want for your star ceiling. Our Classic White Star Kit offers a traditional white twinkle, while our Color Changing Star Kit adds a fun and unique twist with the ability to change the color of your stars.
How Long Does It Take to Install a Fiber Optic Star Ceiling Kit?
On average, it can take anywhere from 1-3 hours to install a fiber optic star ceiling kit fully. This time frame can vary depending on the size and complexity of the project, as well as any obstacles or difficulties that may arise during installation.
To ensure a smooth and efficient installation process, carefully read and follow all instructions included with your kit, gather all necessary tools and materials beforehand, and consider enlisting the help of a friend or professional for assistance. This time may vary depending on the size and complexity of the design, as well as the experience level of the installer.
Will I Need to Hire an Electrician to Install a Star Ceiling?
The answer to this question depends on your comfort level with electricity and the specific requirements of your star ceiling project. Hiring an electrician may not be necessary if you have experience working with electricity and are confident in installing the necessary wiring, lighting fixtures, and control system.
However, it is always recommended to consult with a licensed professional to ensure the safety and proper installation of your star ceiling. If you do not feel comfortable or experienced with electrical work, it is best to hire an electrician for the project to avoid any potential hazards.
Overall, while hiring an electrician may not be required for every star ceiling installation, it is important to consider factors like personal experience and expertise and local building codes to determine the best course of action for your specific project. Consulting with a professional can also help ensure the safe and successful installation of your star ceiling.

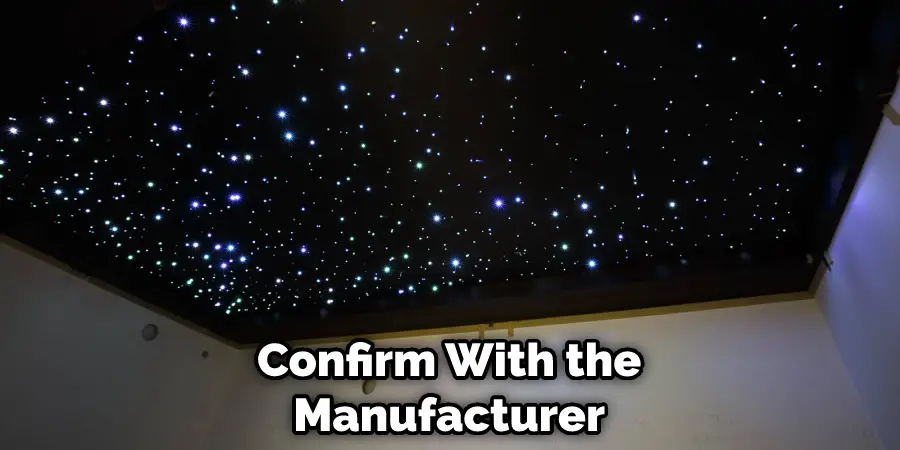
What Temperature Can the Star Ceiling Light Kit Withstand?
The temperature tolerance of a star ceiling light kit will vary depending on the specific brand and model. It is important to consult with the manufacturer or refer to product specifications for information on the temperature tolerances of your particular kit. Generally, most kits can withstand temperatures within a comfortable (0-40 Degree Celsius) indoor range.
Still, it is always best to confirm with the manufacturer to ensure proper use and avoid any potential damage to the lighting fixtures. In addition to considering the temperature tolerances of the light kit, it is also important to ensure that any wiring used for the installation can withstand the temperatures in the room where the star ceiling will be placed. Consult with a professional or refer to product specifications for information on the temperature tolerances of the wiring materials.
Frequently Asked Questions
What Kind of Glue to Use on Starlight Headliner?
Different glues will work better on different types of fabrics. However, some general tips that may be helpful include using a fabric-safe adhesive such as hot glue or E6000, and applying the glue evenly and thinly to avoid bubbles or wrinkles.
What is the Best Material for Headliner?
Different headliner materials have different properties and benefits that may be appealing to certain users. Some of the more popular headliner materials include:
-Cotton canvas: Cotton canvas is a lightweight and affordable material that is often used for headliner because it is relatively easy to work with and has good moisture-resistance. It also has a low-pile finish, which means that it is easy to clean and does not require frequent attention.
-Canvasbacked fabric: Canvasbacked fabric is a heavier and more durable material than cotton canvas, and it is often used for headliner because it offers better protection against water damage, fading, and othermoisture-related problems. Additionally, canvasbacked fabric often has a richer color than cotton canvas and a higher density, which makes it more resistant to wrinkles.
-Polyester fabric: Polyester fabric is a versatile and high-quality material that is commonly used for headliner because it has a variety of properties that make it ideal for this type of application. For example, polyester fabric is moisture-resistant, wrinkle-resistant, and resistant to UV light.
Is Gorilla Glue Good for Headliners?
Gorilla Glue is a common adhesive used to secure headliners in place during live performances. While it is an effective adhesive, it is not recommended for use on sensitive surfaces such as heads or eyes. If you are using Gorilla Glue to attach a headliner to a sensitive surface, it is important to test the adhesive first in an inconspicuous location before applying it to the headliner itself. If any discomfort or irritation occurs after applying the adhesive, discontinue use and consult with a medical professional.
Is There an App to Put Stars on Ceiling?
There are several apps that can be used for a variety of purposes, such as creating a photo collage, designing a template for cardmaking, or tracking your daily activity goals. Some of the most popular apps for these purposes include:
- Pic Collage: This app allows users to create and share photo collages with friends and family, and features a built-in star tool that makes it easy to add stars to the photos.
- CardMaker: This app allows users to design and print custom cards, tags, and other items, and includes a built-in star tool that makes it easy to add stars to the cards.
- Daily Goal Tracker: This app allows users to track their daily activity goals, and includes a built-in star tool that makes it easy to add stars to the goals.
- My Day: This app allows users to create and store reminders, schedules, and other important information, and features a built-in star tool that makes it easy to add stars to the reminders or schedules.
Conclusion
With these simple steps, you can add a star ceiling to any room in your house. You’ll need some tools and materials before you get started, but the project is relatively straightforward. With a little time and effort, you can create a stunning star-filled sky right in your own home. Give it a try today! The process is relatively simple and can be done over a weekend. With a little time, effort, and planning, you can have a beautiful star ceiling that will be the envy of your neighborhood.
You can make a star ceiling using various materials like fiber optics, LEDs, or even construction paper stars. The hardest part is getting the layout correct so that the stars appear evenly distributed across the entire ceiling. Once you have your materials and layout ready, the rest is easy! Just follow our simple instructions, and you’ll have a beautiful starry sky to gaze at every night.
We hope this article has been beneficial in learning how to make a star ceiling. Always ensure the steps discussed here are followed chronologically, and ensure the precautionary measures are followed.