
Did you know that most LED lights have a diy button? This button allows you to change the light’s color and brightness. We’ll show you how to use the diy button on LED lights in this post. Keep reading to learn more. The diy button on led lights is a great way to customize your light display. By pressing the diy button, you can change the colors and patterns of your lights.

Diy button on led lights is a new way to add style and personality to your home. They are easy to install and can be used in various ways to create different looks. You can purchase them online or at your local hardware store. The most popular use for these lights is in the kitchen, where they can be used as under cabinet lighting.
You can also use them in the living room to add a touch of class and sophistication. Many people use them in their bathrooms since they provide a warm, inviting atmosphere. There are many different styles and colors of diy button-on led lights available, so you should be able to find the perfect match for your home.
Summary: If you’re looking for a way to personalize your LED lights, you can use a DIY button. This simple modification allows you to control your lights with your own two hands, making them perfect for tasks like turning on a light when you enter a room or turning off a light when you leave it.
10 Effective Ways on How to Use the Diy Button on Led Lights
1. Turn on the Diy Button
To change the colors of your light, you first need to turn on the diy button. This button is usually on the back of the light or the remote control. Once you have found the button, press it and hold it for a few seconds. The light will then turn on, and you can start changing the colors.
2. Change the Color
If you want to change the color of the light, first turn on the light. Then, press the “Mode” button on the controller. Each time you press the button, the light will change to a different color. There are seven colors to choose from, so keep pressing the button until you find the one you like.

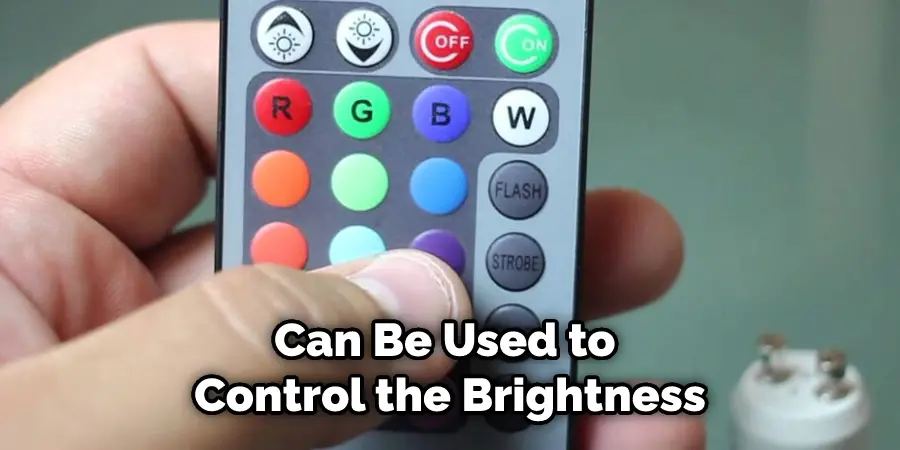
3. Change the Brightness
If you want to make the light brighter, you can hold down the diy button for a few seconds. The light will change to a brighter setting. You can continue to hold the button down to cycle through the different brightness settings. To dim the light, you can press and hold the diy button for a few seconds. The light will change to a dimmer setting. You can continue to hold the button down to cycle through the different brightness settings.
4. Save the Settings
Once you have found the perfect color and brightness, you can save the settings by pressing the “Memory” button. This will save the current settings to the internal memory of the LED light so that you can easily recall them later. To recall the saved settings, press the “Memory” button again.
The LED light will then revert to the previously saved settings. The LED light will display a warning message if it detects that the temperature of the LEDs is getting too hot. If this happens, you can increase the cooling time by pressing the “Cooling” button. This will increase the amount of time that the cooling fans are active.
5. Try Different Patterns
In addition to solid colors, the diy button on led lights can also be used to create different patterns. To do this, simply press and hold the diy button while pressing the color-changing button. This will cause the light to cycle through various colors and patterns. You can experiment with different combinations to create the perfect ambiance for your space.

6. Use the Timer Function
If you want the light to turn off automatically, you can use the timer function. To do this, press and hold the button for three seconds. The light will then flash, and the timer will start. The light will turn off after 30 minutes. To cancel the timer, press the button again.
7. Using the Memory Function
The memory function allows you to turn on the light at the last used settings. Turn off the light and then back on within 3 seconds to engage the memory function. The default setting is for the light to turn on at last used color and brightness. To use the memory function, follow these steps first, Turn off the light. Within 3 seconds, turn the light back on.
Next, the light will turn on at last used color and brightness. To turn off the memory function, please follow these steps. Turn off the light, then back on, and hold for 3 seconds. The light will turn off, and the memory function will be disengaged. The light has a low power consumption of 3 watts but is very bright, with an output of 250 lumens. It has a lifespan of 50,000 hours which is about 20 years if used for 3 hours per day.
8. Turn Off the Light
When you are finished using the light, you can turn it off by pressing and holding the diy button for a few seconds. The light will then turn off, and you can release the button. If you need to turn the light back on, press and hold the diy button again for a few seconds, and the light will turn back on. You can also use the diy button to dim the light by pressing and holding the button until the light reaches the desired brightness.

9. Use the Light Remotely
In addition to using the diy button on the light itself, you can also use a remote control to turn the light on and off. The remote control can be used to dim the light, change the color of the light, and even set a timer for the light. You can also use the remote control to turn the light on and off from a distance. This is especially helpful if you have the light in a difficult-to-reach place. To use the remote control, you will need first to connect the light to the remote control. You can do this by using a cable or by using Bluetooth.
Once the light is connected to the remote control, you can then use the remote control to turn the light on and off. You can also use the remote control to dim the light, change the color of the light, and even set a timer for the light. If you want to use the light remotely, you will need to purchase a remote control. You can purchase a remote control from a variety of different retailers.
10. Use the Light with a Smartphone
In addition to using the diy button on the light itself, you can also use a smartphone to control the light. There are a few different ways to do this, depending on the type of phone you have. You can use the free LIFX app if you have an iPhone to control your light. Once you have the app installed, open it and tap the “+” button in the top-right corner. You’ll need to select your light from the list and then follow the on-screen instructions to connect it to your Wi-Fi network.

Once your light is connected, you can use the app to turn it on or off, change the color, and even set schedules. Android users can also use the LIFX app, but there are other options as well. One of these is the Smart Life app, which also works with various other smart devices. To use the Smart Life app, you’ll first need to create an account and then add your light to the app. To do this, tap the “+” button in the top-right corner and then select “Device” from the list.
Next, choose your light type and follow the on-screen instructions to connect it to your Wi-Fi network. Once your light is connected, you can use the app to control it in much the same way as the LIFX app.
You Can Check It Out to Install Led Strip Under Cabinet Lighting
Why Isn’t My Diy Button Working on My Led Lights?
If you’re having trouble getting your Diy button to work on your Led lights, there are a few things you can check. First, make sure that the Diy button is properly installed and connected. If it’s not, then it won’t be able to control the Led lights. Second, check the batteries. If they’re low, then they may not have enough power to operate the Diy button. Finally, if all else fails, you can try resetting the Diy button. Simply press and hold the reset button for 5 seconds to do this. If that doesn’t work, then you may need to replace the Diy button.
You Can Check It Out To Set Up Lepro Led Lights
Frequently Asked Questions
What Does Buttons on Led Light Remote Do?
Buttons on a light remote can be used to control the brightness, color, and other settings of your lights. This is useful when you want to change the mood or atmosphere of a room without getting up from your seat. You can also use buttons on a light remote to turn off all of your lights in one go if you’re leaving for the night.
If you need help finding the right button for controlling your lights, simply consult our LED Light Remote Finder tool below!
Can You Reset Diy Led Lights?
Yes, you can reset DIY led lights. By clicking the “Reset” button on the light’s settings page, you will be able to reinitialize the light with its factory defaults. This should restore its settings and correct any errors that may have occurred.
What Does V+ and V Mean on Led Light Remote?
There are a few different types of remote controls that use batteries, each with its own set of functions. One type is the V+ remote control, which is used to change the channel on a television. The letters “V” and “V” represent the channel numbers that are displayed on the screen. The “+” sign next to the number indicates that the channel has been turned up, and the “-” sign indicates that it has been turned down.
Can You Use Any Led Light Remote?
Yes, you can use any Led light remote. While some brands are made specifically for using with other brands of lights, most generic remotes can be used with any type of light. Just make sure that the controller will work with your specific brand of light and that it has the correct power output.
Conclusion
This article has covered how to use the diy button on led lights. You should now understand how to use the diy button on led lights and what it can do for you. You should also be able to troubleshoot any issues you may be having with the button. The DIY button on LED lights is a great way to save money and customize your light settings. By understanding how the DIY button works, you can create the perfect lighting for any occasion. Have you tried using the DIY button on your LED lights? What difference did it make in your home? Write down your thoughts in the comments below.