Have you ever tried to change a headlight bulb on your Dodge Charger and found out that the process is more difficult than it seems? If your Dodge Charger’s headlight bulb has gone out, don’t despair. It’s a quick and easy fix. In this blog post, we’ll show you how to change dodge charger headlight bulb. We’ll also provide some tips for keeping your headlights in good condition.

If you are like most drivers, you probably don’t give much thought to your car’s headlights until one of them goes out. When that happens, you need to know how to change the headlight bulb. We will show you to change the headlight bulb of your dodge charger. We will also provide some tips on how to choose the right headlight bulb for your car. So read on if you want to learn more about changing Dodge Charger headlight bulbs.
Should I Replace both Headlight Bulbs if One Goes Out?
The short answer is yes. You should replace both headlight bulbs if one goes out. This is because headlights don’t just provide illumination; they also act as a safety feature. When both headlights are working properly, they create an even beam of light that helps the driver see more clearly and further down the road. With only one headlight functioning, the uneven beam can create blind spots and reduce visibility for other drivers on the road.
In addition, replacing both bulbs ensures that the level of lighting remains consistent between them. If one bulb is significantly brighter than the other, it can be distracting for other drivers or cause glare for oncoming traffic. Another reason to replace both bulbs at once is to maintain symmetry in your car’s exterior lighting, which is important for keeping your car looking great.
It’s always best to replace both headlight bulbs if one goes out as a safety precaution and for aesthetic reasons. This way, you can be sure that your headlights are providing an even beam of light and keeping the exterior of your car looking its best. Plus, it won’t take too long to do so—it should only take about 10 minutes or so, depending on the model of the car. So don’t wait; replace those headlight bulbs when one burns out!

10 Methods How to Change Dodge Charger Headlight Bulb
1. Locate the Headlight Assembly.
The headlight assembly is located on the front side of the Dodge Charger. It holds both low and high-beam headlights. Make sure to use caution and avoid contact with the headlights. If you need assistance locating the headlight assembly, refer to your owner’s manual. Make sure to keep track of all the screws and bolts, as they will be needed in the installation process.
2. Disconnect the Battery.
Before attempting to change a headlight bulb, disconnect the negative terminal from your car battery to avoid any electrical shock while handling light bulbs and wiring during installation. Although unlikely, this precaution can help prevent any potential injury or damage to the vehicle. If you need help with this step, please consult your owner’s manual.
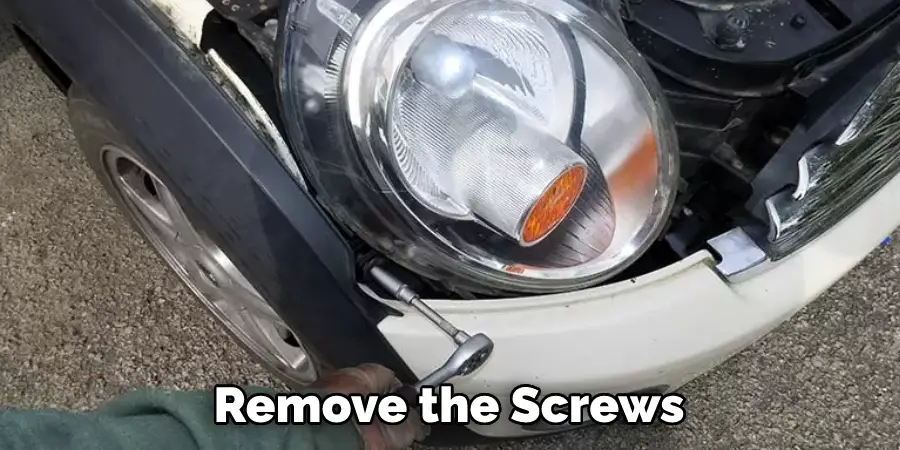
3. Remove Headlight Assembly Cover Bolts.
Use a Philips screwdriver or socket set to remove the screws holding in the headlight assembly cover from behind the bumper grill. Pull out the headlight assembly cover gently, taking care not to break it as some models are made of plastic material which can be easily damaged if handled roughly.
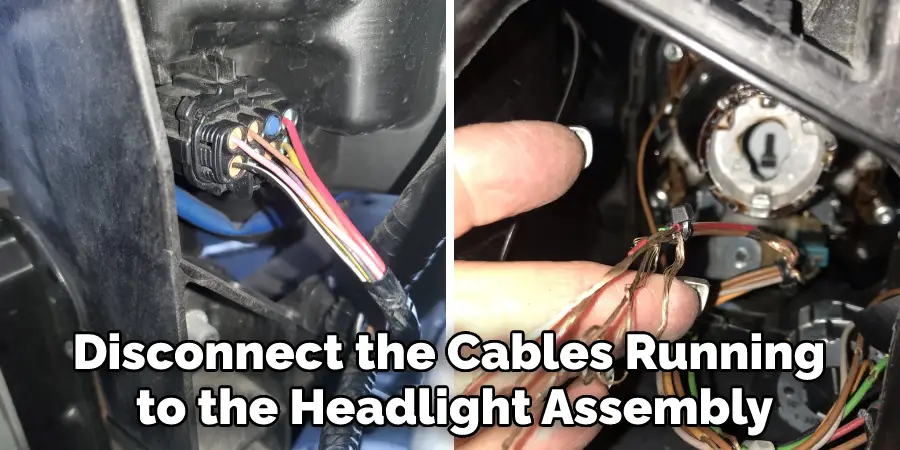
4. Unplug the Headlight Connector Cables.
Once you have the cover off, disconnect the cables running to the headlight assembly by pressing down on the release tabs and carefully unplugging them. While these are not necessary for changing the headlights, it is important to disconnect them to avoid any potential damage. Try to keep track of the cables and their positions in case you need to reattach them later.
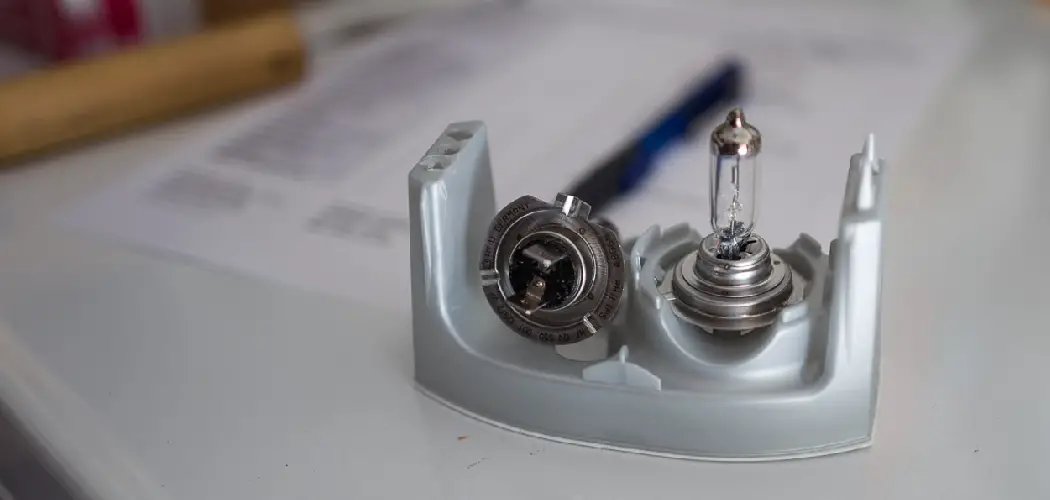
5. Remove Old Headlight Bulb.
Take out the old bulb from its socket and discard it responsibly as per local disposal regulations. While this may seem easy, be careful not to touch the glass with your bare hands as the oils from your skin can cause it to overheat and eventually burn out. Use a pair of gloves or some cloth to handle the bulb while you’re taking it out. Make sure to keep track of the screws and bolts for later.
6. Install New Headlight Bulb.
To install a new headlight bulb in your Dodge Charger, insert it into its respective socket with care and make sure that it is securely fastened so that it does not move around or come loose when driving at high speeds or over bumps in the road. While doing so, check the connections to ensure that they are in proper working order.
7. Reconnect Headlight Connector Cables.
Reattach the cables running to the headlight assembly and make sure that they are firmly connected. Try to keep track of the cables and their positions in case you need to reattach them later. Make sure that the cables are not loose or broken, as this can cause a decrease in the performance of your headlights.
8. Test New Headlight Bulb.
With the battery still disconnected, turn on the headlights and check that the new headlight bulb is working correctly by shining it against a wall or other object to see if it is lighting up properly. While the headlights are on, inspect the area around the assembly for any visible signs of damage or wear.
9. Reconnect Battery Terminal.
After confirming that the headlight bulb is working correctly, reconnect the negative terminal of your car battery to restore power to your vehicle. If you need help with this step, please consult your owner’s manual. Make sure to double-check that everything is properly connected before turning on the engine.
10. Check Headlight Alignment.
If necessary, adjust the alignment of your headlights using an adjustable wrench and a hex key so that they are pointing in the correct direction. Make sure that both low and high-beam lights are aligned properly for maximum visibility on roads and highways at night or during low-light conditions. Make sure to double-check that everything is properly connected before turning on the engine.
Finally, after changing out your Dodge Charger’s headlight bulbs, take it for a test drive around town to make sure that everything works as intended and that you can see clearly when driving at night or over a bump.
By following these steps, you should have successfully installed a new headlight bulb in your Dodge Charger. Be sure to perform regular maintenance on your vehicle’s lightbulbs and always take extra care when handling electrical components in order to ensure the safety of yourself and others while driving.
Things to Consider When Changing Dodge Charger Headlight Bulb
1. Check your owner’s manual to determine the right type and size of headlight bulb for your Dodge Charger. As there are several different sizes and types of bulbs, it is important to ensure that you select the correct size and wattage for your specific model.
2. Purchase the appropriate bulb(s) from an automotive supply store or online retailer. Make sure to double-check that the part number matches exactly what is recommended in your owner’s manual before making a purchase.
3. Once you have the replacement light bulb, open up the hood of your vehicle and locate the headlight housing unit which contains the old bulb. Depending on the model year, either use a screwdriver or a plastic fastener remover to remove the screws that hold the lighting unit in place. Carefully take out the old bulb, and proceed to insert the new one.
4. Consider upgrading your Dodge Charger headlight bulbs to a higher performance set from a trusted manufacturer such as Philips, PIAA or Osram. Upgrading your headlights can provide better illumination for nighttime driving and greater visibility of hazards when driving at highway speeds.
5. When replacing both bulbs at once, make sure to check all other lighting components as well, such as turn signals, fog lights, or daytime running lamps, since they may be due for replacement also after several years of use. Once you are done with replacing all components, close up the hood and test the new headlights to make sure they are functioning as they should.
6. Finally, carefully dispose of the old headlight bulbs according to local regulations. Many car parts and hardware stores accept used lightbulbs for recycling or disposal in an environmentally safe manner. Always check with your local municipality to see what sort of options are available in your area when disposing of hazardous waste, such as automobile lightbulbs.
7. If you’re unsure about any part of replacing a headlight bulb in a Dodge Charger, consult with a certified mechanic who can provide expert advice and assistance if needed. This will ensure that the job is done safely and correctly and also save you time and money when it comes time to replace your headlight bulbs.
Following these steps will help ensure that you are able to properly change the headlight bulb in a Dodge Charger and get it up and running again safely. With regular maintenance and proper care, your headlights can stay bright for many years to come. By following these tips, you can keep your vehicle’s headlights in top condition for years to come. Good luck and happy driving!

Frequently Asked Questions
Can I Replace a Headlight Bulb Myself?
Yes, you can replace a headlight bulb yourself. Headlight bulbs are typically smaller and less expensive to replace than other car parts, so it’s often a cost-effective option to do it yourself. There are a few things you’ll need before you start: a Phillips head screwdriver, a headlight socket wrench, and a new headlight bulb.
First, remove the screws that secure the headlight assembly to the car. You’ll need to use a Phillips head screwdriver to remove them. Be sure to note the location of the screws, as you’ll need them later. Once the screws are removed, gently pull the headlight assembly away from the car.
Next, find the replacement headlight bulb and unscrew it from the light socket. Make sure to keep the light socket in one piece as you unscrew it; if not, you can break it and have to buy a new one. Once the bulb is unscrewed, place it in a bowl or bag so that any glass shards fall out.
Now comes the tricky part: reassembling the headlight assembly. You’ll need to put the screws back in place and tighten them using your socket wrench. Be sure to note which screw goes where; you’ll need them later when you test the new bulb. Once everything is reassembled, test it by turning on the headlights and checking that they work properly.
How Much Does It Cost to Change a Headlight on a Dodge Charger?
The cost to change a headlight on a Dodge Charger typically ranges from $80 to $120, depending on the make and model of the car. There are some factors to consider when calculating the cost, such as the type of headlight being replaced and the difficulty of replacing it.
Do I Need to Replace the Whole Headlight or Just the Bulb?
It is generally recommended that you replace the entire headlight, rather than just the bulb, when your headlights are not working properly. This is because the headlight assembly is made up of several parts, including the light bulb, reflector, and housing. If just the bulb is replaced, the other parts may still be defective and will not work as intended. By replacing the entire headlight assembly, you can ensure that your headlights are functioning at their best and are providing optimal visibility.
What Should You Never Do When Changing Your Headlight Bulbs?
When changing headlight bulbs, it is important to avoid doing any of the following:
- Removing the headlight assembly from the car with the headlights on
- Touching or moving any electrical components within the headlight assembly
- Attempting to change a headlight without first turning off the vehicle’s engine and removing the key from the ignition
- Exposing any part of your body other than your face to direct sunlight while working inside the car
- Working with flammable materials such as gasoline, paint, or solvents
Conclusion
With the above steps, you can easily replace the Dodge Charger headlight bulbs in just a few minutes and have your car back on the road with maximum visibility. Always remember to check your owner’s manual for the correct size and wattage of the bulb for your model. It is also very important to dispose of old lightbulbs according to local regulations. If you need additional help or advice when replacing the headlights, it is best to consult with a certified mechanic who can provide expert assistance if needed.
Thanks for reading our blog post on how to change dodge charger headlight bulb! We hope you found it helpful and informative. Happy driving!