
Changing a light bulb in a flush-mount ceiling light is not as hard as it seems. In fact, with the right tools and some basic knowledge, you can easily change the light bulb in your ceiling light without any problems. Here is a guide on how to change light bulb in flush mount ceiling light.
Can You Change Light Bulb in Flush Mount Ceiling Light?
While many people attempt to change their light bulbs, it is not always easy. Changing a light bulb can be tricky and even dangerous, depending on the type of light fixture. For example, attempting to change a light bulb in a flush-mount ceiling light without the proper tools and safety equipment can lead to serious injury.
Without the proper knowledge, it is easy to damage the light fixture or cause an electrical fire. As a result, it is always best to hire a professional to change your light bulbs. Not only will they have the necessary tools and equipment, but they will also know how to handle properly and dispose of the old light bulbs.
Why Should You Change Light Bulb in Flush Mount Ceiling Light?
Many people choose flush-mount ceiling lights for their homes because they are low-profile and unobtrusive. However, one disadvantage of these fixtures is that they can be difficult to change when the light bulb burns out. In some cases, the entire fixture may need to be replaced.
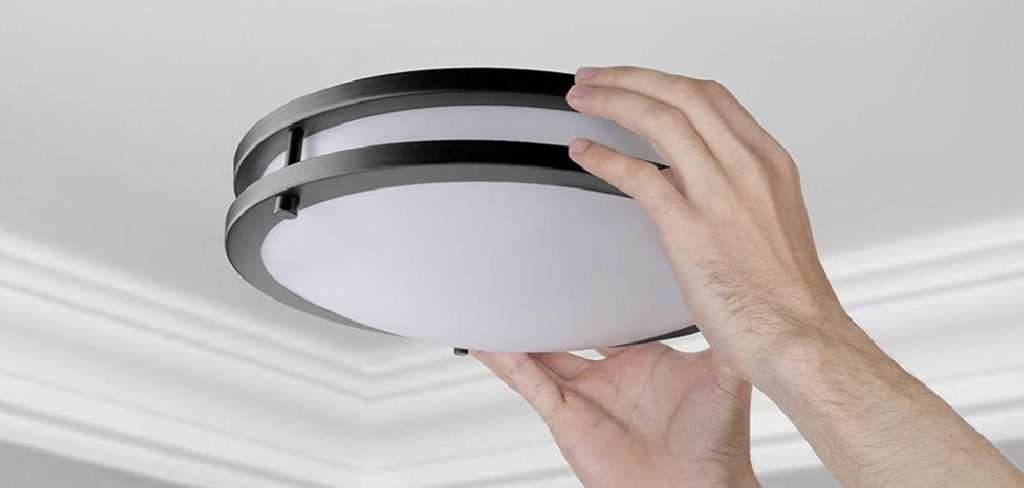
To avoid this expense, it is important to know how to change the light bulb in a flush-mount ceiling light. The first step is to turn off the power to the fixture at the breaker box. Once the power is off, remove the glass shade from the fixture.
In most cases, the shade will be held in place by clips or screws. Once the shade is removed, you can see the light socket. Reach up and unscrew the burned-out light bulb from the socket using a ladder or stool.
Be sure to handle the new light bulb carefully, as touching it with your fingers can shorten its lifespan. Screw in the new light bulb and replace the glass shade. Turn on the power to the fixture and enjoy your newly illuminated room!

What You’ll Need
- A stepladder or chair (depending on how tall you are)
- Dust cloth or towel (to keep your hands clean)
- A new light bulb (make sure it’s the same size and type as the one you’re replacing!)
- Something to dispose of the old light bulb (a trash can or recycling bin)
Now that you have everything you need let’s move on to the process of changing your light bulb.
7 Tips to Follow on How to Change Light Bulb in Flush Mount Ceiling Light
1. Turn Off the Power
The first step in changing a light bulb in a flush-mount ceiling light is to turn off the power to the fixture. This can usually be done by flipping a switch on the wall near the light. If there is no switch, you will need to find the breaker in your home’s fuse box that controls the power to the light and flip it to the “off” position.
2. Remove the Old Light Bulb
Once the power is off, you can remove the old light bulb from the socket. Depending on your fixture’s design, simply unscrew and remove the old bulb. If you have to twist it out, be sure not to touch the bulb’s glass with your fingers, as oils from your skin can cause it to heat up more than usual and break. Be sure to dispose of the used light bulb properly.
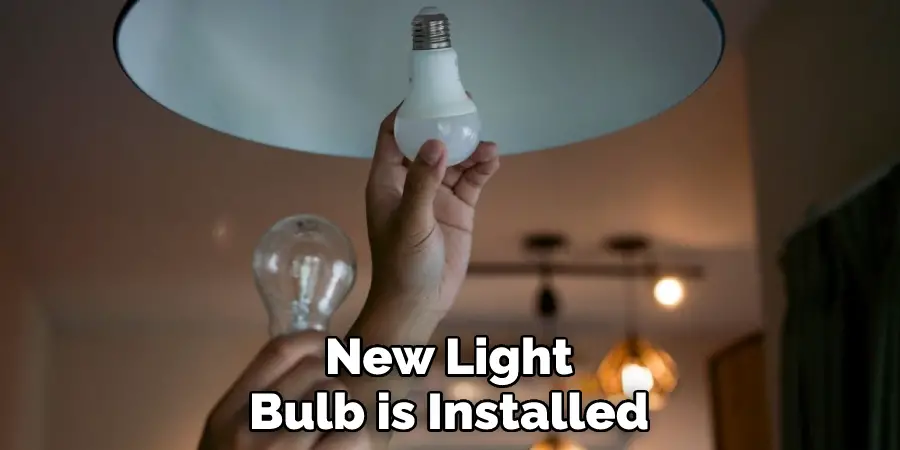
3. Install the New Light Bulb
Now it’s time to install the new light bulb into the socket. Make sure to align the light bulb correctly, so it’s ready for use. It’s important to handle new light bulbs carefully, as you don’t want to break the filament before even using them. Once the light bulb is in place, screw it into the socket and twist it clockwise until it is securely in place.
4. Turn on The Power
Once the new light bulb is installed, it’s time to turn the power back on. To do this, flip the breaker switch in your home electrical panel box. You may need to refer to a label or diagram inside the panel box for how each switch is labeled.
You Can Check It Out to Replace Bulb in Panasonic Microwave
5. Test the New Light Bulb
Now that the power is back on test out your new light bulb by turning on the switch or pulling the chain (if your fixture has one). The light should come on without any problem. If it doesn’t, make sure that you installed the bulb correctly and that there isn’t a loose connection somewhere in your wiring.
6. Repeat as necessary.
If you have multiple flush-mount ceiling lights in your home, you may need to repeat this process a few times. Always remember to be safe while changing the lightbulb, and if you are unsure how to proceed at any time, call an electrician for assistance.
7. Replace Light Covers (Optional)
If you want to complete the job, replace any light covers that were removed during this process. This will help your lights look more uniform and protect them from outside elements such as dust and moisture.
That’s it! You’ve now learned how to change light bulb in flush mount ceiling light. This is an easy and straightforward process that doesn’t require any special tools or skills. With just a few simple steps, you can quickly have your lights up and running in no time!
Things You Need to Know Before Changing Light Bulb in Flush Mount Ceiling Light
If you have a flickering light bulb in your flush-mount ceiling light, it’s probably time to change it. But before you do, there are a few things you need to know. First, make sure you have the right type of bulb. Most flush-mount lights use either incandescent or LED bulbs, but some may require specialty bulbs.
Second, take note of the wattage listed on the light fixture. This will ensure that you purchase a bulb with the correct amount of power. Finally, be careful when replacing the old bulb with the new one. It’s easy to knock the light fixture out of alignment accidentally, so take your time and be gentle.
With a little care and attention, changing a light bulb in a flush mount ceiling light is a simple task.

5 Benefits of Changing LED Light Bulb in Flush Mount Ceiling Light
1. Reduced Energy Consumption
One of the primary benefits of changing your light bulb to a flush-mount ceiling light is reduced energy consumption. LED bulbs are much more energy-efficient than traditional incandescent bulbs, and they last much longer as well. This means that you’ll save money on your energy bills and won’t have to change your light bulb as often.
2. Improved Light Quality
Another benefit of switching to an LED bulb in your flush mount ceiling light is improved light quality. LED bulbs emit a brighter, whiter light than incandescent bulbs and don’t produce any glare or flickering. This can help improve your home’s visibility and make it feel more inviting.
3. Enhanced Durability
LED bulbs are also much more durable than traditional incandescent ones, making them less likely to break or burn out. This makes them a great option for homes with children or pets, as there’s no need to worry about broken glass or hot surfaces.
4. Eco-Friendly Option
LED bulbs are an eco-friendly option since they don’t contain any harmful chemicals or toxins. They’re also 100% recyclable, so you can feel good about doing your part for the environment when you switch to LED bulbs.
5. Lower Maintenance Costs
Since LED bulbs last much longer than traditional incandescent bulbs, you’ll save money on maintenance costs over time. You won’t have to replace your light bulb frequently, and you won’t need to hire someone to do it for you, either.
Some Common Mistakes People Make When Trying to Changing Light Bulb in Flush Mount Ceiling Light
There are a few common mistakes people make when they are trying to change a light bulb in a flush-mount ceiling light. One mistake is not turning off the power to the fixture before beginning. This can be dangerous and lead to an electric shock.
Another mistake is using the wrong size bulb. Again, be sure to check the manufacturer’s recommendations for the correct size before purchasing a new bulb. Finally, some people try to change the bulb without removing the glass shade.
This can be tricky and is best avoided by taking the time to remove the shade first. Then, with a little care and attention, changing a light bulb in a flush mount ceiling light can be a simple and straightforward task.

Frequently Asked Questions
Can You Remove a Flush Mount Ceiling Fan?
Flush mount ceiling fans can be removed in a number of ways. The most common way to remove a flush mount ceiling fan is to use a wire cutter or saw. You will need to cut the power and light cables at the junction box, and then remove the fan from the mounting bracket. Another method involves using a drill and an angle grinder. You will need to remove the bolts that secure the fan to the mounting bracket, and then remove the fan.
What is Flush Mount Ceiling Fan?
Flush mount ceiling fan is a type of ceiling fan that mounts flush against the ceiling, with no visible blades or arms. They are often used in bedrooms or other spaces where a more discreet look is desired, and they are also popular among renters who do not want to have exposed blades or wires hanging down from the ceiling. Flush mount fans typically have fewer speeds and less range than traditional ceiling fans, but they are typically quieter and easier to operate.
What is the Difference Between Flush Mount and Hugger Ceiling Fans?
Flush mount fans are designed to be mounted flush against the wall, while hugger ceiling fans are designed to be mounted higher off the ground, providing more clearance for taller people. Flush mount fans tend to be less expensive than hugger ceiling fans, and they also tend to have a smaller footprint, meaning they can be placed in more spaces. Hugger ceiling fans are typically more decorative and appealing, and they may provide a more comfortable airflow than flush mount fans.
Is Wall Mount or Ceiling Mount Better?
In general, wall mount systems are easier to install and typically have fewer cords and cables running throughout the home. They’re also less likely to be knocked over or trip over cables, making them safer for children and pets. On the other hand, ceiling mount systems typically offer a wider viewing angle and can be more convenient if you need to work from multiple locations in the room. It’s important to consider your needs when choosing a system – whichever option is best for you will depend on your specific situation and preferences.
Conclusion
Once you’ve replaced the bulb, be sure to wipe down your light fixtures and flush the mount the ceiling with a damp cloth as needed. This will keep them clean and help prevent dust and dirt buildup. If you have any problems along the way, don’t hesitate to contact an electrician for assistance.
Changing a light bulb in a flush-mount ceiling light is a simple task that can be done in just a few minutes. Thanks for reading our post about how to change light bulb in flush mount ceiling light.