No one wants to be in a situation where they’re driving, and their car suddenly dies. While there are some things you can do to prevent this from happening, it’s always best to be prepared for the worst. One thing you can do is locate the reverse light wire on your car. This way, if your vehicle does die, you’ll at least be able to back up safely. In this article, We will teach you how to find reverse light wire.
Reverse light wiring can be tricky to find, but it’s a breeze with a little bit of know-how. In this article, we’ll show you where to find the reverse light wire on your car and how to connect it.
Summary: Finding the reverse light wire is essential when installing a backup camera, reverse sensors, or any other accessory that relies on the activation of your vehicle’s reverse lights. The reverse light wire is the one that sends power to the reverse light bulbs when your vehicle is shifted into reverse gear. Identifying the correct wire will ensure the proper function of your installed accessories and avoid potential damage to your vehicle’s electrical system.
To locate the reverse light wire, start by consulting your vehicle’s wiring diagram or service manual, which can provide specific information on wire colors and locations. If you don’t have access to a diagram or manual, you can locate the reverse light wire by examining the wiring harness at the back of your vehicle, usually near the taillight assembly. With the vehicle in reverse and the ignition on, use a multimeter or test light to probe each wire and find the one that carries a voltage signal when the reverse gear is engaged.
The reverse light wire is typically a different color from the other wires in the harness, and its color may vary depending on your vehicle’s make and model. Be sure to exercise caution when working with your vehicle’s electrical system and only perform this process if you feel comfortable and knowledgeable about automotive wiring. If you’re unsure or uncomfortable with the process, consider consulting a professional mechanic or automotive electrician to assist with locating the reverse light wire.
Tools and Materials
- Multimeter
- Electrical Tape
- Wire Strippers
- Needle nose Pliers
A Stepwise Guide on How to Find Reverse Light Wire
Step 1 : Before You Start
Before finding the wire that will turn your car off, you should raise both feet. This will prevent you from accidentally triggering the reverse lights while trying to find it. Once your vehicle isn’t running, you should turn off all of its lights. To disconnect the negative terminal on your battery, you should either locate the fuse box or look for a black wire coming from your engine. Once you find it, open the lid and remove the 10mm bolt.
If you’re planning on working on your car’s electrical system, it’s important to disconnect the power first. This will prevent you from getting shocked by electricity. Note: If you’re not sure how much voltage is running through this area, it’s best to contact a professional.
If you want to improve safety when working with a battery, you should cover the area around it with newspapers. This will create a barrier between you and the battery, in case something goes wrong. It’s also important to work on a clean, flat surface. This will help to prevent any accidents.
Step 2 : Find Wire Crimp Connector
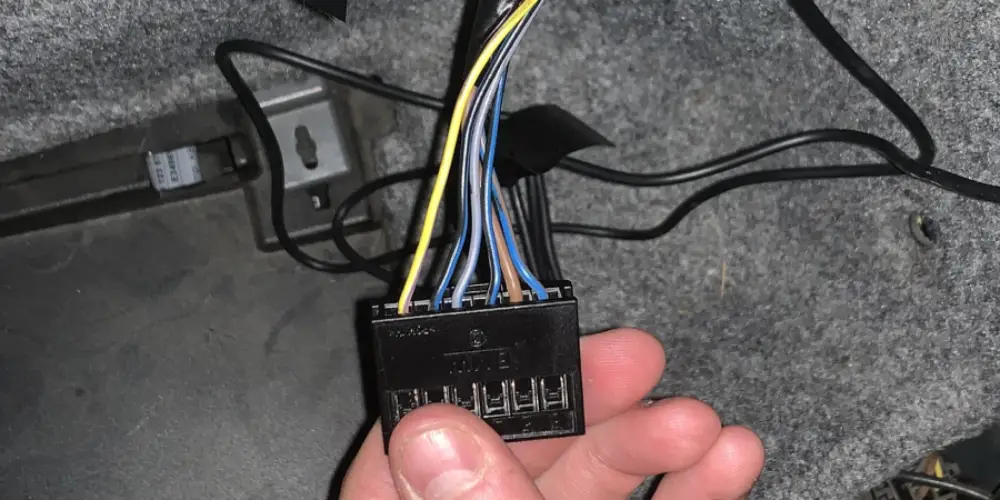
After covering your car in newspaper and ensuring that there is no electricity running to it, find the reverse light wire. This is usually a green and white (or yellow and black) wire. Once you find the crimp connector or back of your reverse lights, use your needle nose pliers to cut off any excess wire from the crimp connector, as well as a strip of wire about 3/4 to 1 inch long. This is a crucial step in finding the reverse light wire.
Step 3 : Find Reverse Light Wire with Multimeter
Before testing the wire, unroll a piece of electrical tape and place it on your multimeter’s probes or wrap the ends around them. This will prevent you from accidentally touching the wrong button and shorting out your multimeter while continuously pressing different buttons. Now that you have done this, test whether or not there is electricity running through the crimp connector terminal by turning your car key forward (as if trying to start it).
If you see a small number of volts running across both probes, it means that your car’s electrical system is working properly. If you don’t see anything after cranking your car forward, it means that your car’s electrical system is shorted out and needs to be fixed.
If your car won’t start, first try turning the key off and then trying other wires until you find one that works. If that doesn’t work, try turning the ignition switch again but this time, turn it back immediately after hearing a click or seeing a single flash of electricity run across the probes. This should reset your car’s electronics, opening all wires for testing.
Step 4 : Again, Find Reverse Light Wire by Using Multimeter
Although everything should have been put together before now, if not, do so now. Once everything has been appropriately connected, go ahead and test the red wire once more with your multimeter. Be sure that you are touching the wire gently with probes or wrap them around the wire themselves.
Once you have found the correct red wire, you should mark it in some way so you won’t confuse it with any other cables that look similar. Although this might sound like unnecessary extra work, you will find out for yourself how easy it is to get something as small as a different colored piece of electrical tape mixed up.
Step 5 : Finish Up
Once you have entirely tested your wire and know what belongs, unroll another piece of electrical tape and place it on top of your crimp connector terminal. Be sure to cover the entire area surrounding it so nothing will short-circuit after installing.
You can now safely tuck away your crimp connector in an appropriate spot within your dashboard or behind the kick panel, depending on where you plan to install it. Once this is done, re-attach your reverse lights back onto your vehicle’s body and gently tuck the wire away for storage.
Step 6 : Connect Reverse Light Wire
Before attaching anything back together, be sure that every piece is connected securely; otherwise, you will end up with a loose connection which can cause damage to other components of your car’s electrical system.
After everything has been connected correctly, carefully tuck your new reverse light wire underneath the headliner or wherever you have decided upon installing it. Don’t make any fast or unnecessary movements as this could cause physical harm not only to yourself but to others who may be riding with you.
Once again, you can now test your connection by turning your key forward (as if starting the car) without thinking of what will happen if it doesn’t start this time. If everything is connected correctly, nothing will happen, and you can breathe a sigh of relief knowing that you didn’t just fry your brand new vehicle’s electrical system. These steps will help in how to find reverse light wire.
You can check out it to Remove Check Engine Light Bulb
Precautions
- Make sure that there is no power in the car when working on it. Disconnecting any electrical component can cause injury or start a fire. Always work with either both hands or one hand and your knee holding something down to ensure it doesn’t move around while working on it.
- Be prepared for all kinds of weather, especially rain. If possible, wait until an outdoor part can be worked on without getting wet before doing the job (especially the gas tank cover). Remember that there aren’t fixed hours to do this kind of stuff; if you need to go out at night to do some work because you’re broke and don’t have anything better to do, then so be it! Just take precautions not to get hurt if something goes wrong.
- Always be prepared to break something even if you are an expert in what you’re doing. If it’s your first time, then there is no question that you will fail at least one screw or bolt, sometimes more than one! Just make sure to work efficiently and slowly rather than fast and complex because the harder you try, the more likely this is to happen.
What is a Reverse Light Wire?
A reverse light wire is a type of signal that can be used to help detect when a vehicle is moving in reverse. Reverse light wires are commonly used in cars, vans and other motor vehicles. The wire is connected to the vehicle’s reversing lights, allowing them to turn on as soon as the car goes into reverse, alerting nearby motorists and pedestrians that the car is backing up.
Where to Find Reverse Wire for Head unit?
Reverse wire for your head unit is often found behind the same wire that powers your headlight. You will need to look at the back of the wire to find it. Look for a light blue wire with a dark blue stripe; this wire will lead you to the reverse switch.
When you see this cable, look closely along until you find another cable running parallel with it. This is your reverse cable and should be marked so, or else you can test it by touching both wires together (you’ll see power flow through it if it’s the right one).
Now all you need to do is connect each end of these cables into their respective positions on your new deck using standard speaker connections. Please note that not all head units have a reverse wire. If yours doesn’t, you may have to splice the power from your car’s reverse lights into the brown wire of your new head unit. This is more difficult as it requires stripping and soldering.
At times, some head units do not have a blue or gray wire on them for powering the unit off of, especially in newer cars due to a lack of a 12v accessory lead running to the fuse box. In this case, you will need to run a wire from behind your headlight switch directly to the battery source (ignition switched hot). Please note that you must NOT run this wire through any of your car’s existing wiring.
You Can Check It Out to: Wire Multiple Led Light Bars to One Switch
Frequently Asked Questions
Which Wire is My Reverse Wire?
A reverse wire is a magnetic connector that can be used to connect two poles of an electric fence. It has a concave shape and comes in three sizes- small, medium, and large. The small reverse wire fits most fences while the large reverse wire is best for big fences or enclosures.
What Color is Reverse Light?
Sure, you might be able to see light in reverse if you have a mirror and some lights, but what about cars?
Actually, the light that comes out of your car’s reverse light is usually white. This is because the light is being reflected off of the back of the car and then back into the mirror.
Why Does My Reverse Light Have 3 Wires?
If you’re looking for a wiring diagram for your reverse light, then look no further. This article explains the three wires that are typically found on a reverse light and their function. The red wire is used to power the light, while the black and white wires are used to indicate whether or not the brake lights are on.
Is Driving Without Reverse Lights Legal?
Yes, driving without reverse lights is technically legal in most states. In fact, it is not uncommon for drivers to drive without reverse lights when they are in a densely populated area or when they are driving on a highway.
However, there are a few exceptions – specifically, when you are driving in a construction zone or when you are driving an emergency vehicle. In both of these cases, it is important to use reverse lights to alert other drivers of your presence.
Conclusion
We hope you have learned how to find reverse light wire. If you are looking for a quick and easy way to find the reverse light wire, this guide should be helpful. Reverse lights typically run on two types of cables; either power or ground wiring.
The small metal tab that connects your brake pedal with your car’s braking system is typically attached to the grounding wire, so it does not work as well when there is no metal in contact with the vehicle body.
Check it out also – How to Light a Lightbulb With a Magnet and Copper Wire