Do you want to move your bathroom light fixture but are unsure how? It is a simple process that can be completed in minutes. All you need is a screwdriver and ladder. In this article, we will show you how to move bathroom light fixture safely and quickly.
It may seem like a daunting task, but you can do it yourself with some planning and preparation. Follow these simple steps to make the process easy and headache-free.
Summary: Moving a bathroom light fixture may be necessary to accommodate a renovation, new layout, or design preference. The process involves safely disconnecting the existing fixture, relocating the electrical wiring, and installing the light fixture in the new position. It is essential to follow safety precautions, use appropriate tools, and ensure proper electrical connections to achieve a secure and efficient relocation. Additionally, you may need to repair the wall where the original fixture was installed.
Before beginning, switch off the power supply to the bathroom light fixture at the circuit breaker to minimize the risk of electrical shock. Carefully remove the existing light fixture by unscrewing or unclipping any securing mechanisms and disconnecting the wiring. To relocate the electrical wiring, you may need to drill holes through wall studs or use a fish tape to guide the wires through the wall cavity.
If you are not familiar with electrical work, it is highly recommended to consult a professional electrician for assistance. Ensure that the wiring is long enough to reach the new fixture location and that the electrical box is properly installed and secured in the new position.
Once the wiring is in place, install the light fixture in the new location by connecting the wiring according to the manufacturer’s instructions. This typically involves connecting the black (hot) wire to the fixture’s black wire, the white (neutral) wire to the fixture’s white wire, and the green or bare copper (ground) wire to the fixture’s ground wire or grounding screw.
Secure the fixture to the wall using appropriate screws or clips, and then attach the light cover, if applicable. Restore power to the circuit and test the functionality of the light fixture in its new position. Finally, repair any damage to the wall where the original fixture was installed, such as filling holes, patching, or painting, to ensure a seamless finish. By following these steps and exercising caution, you can successfully move a bathroom light fixture to a new location.
You Will Need
- Tape measure
- Flashlight
- Pry bar
- Torpedo level
- Socket wrench
- Screwdriver
A Step by Step Guide on How To Move Bathroom Light Fixture
STEP 1 : Turn Off the Power.
Before you begin your bathroom renovation, be sure to turn off the power at the main breaker panel. This will ensure that there is no risk of electric shock. Once the power is off, double-check to be sure that the electricity is completely off before beginning your project.
Step 2 : Let’s Do The Marking!
In order to move the bathroom light fixture, first turn the power off. Then, take a pencil and make an “X” on the wall where your old light lies. Make a corresponding mark in precisely the same place on your new ceiling.
To avoid making a mistake while you move the bathroom light fixture, use a level to ensure that the marks are straight and even with each other.
Step 3 : Cut Out With Drywall Saw.
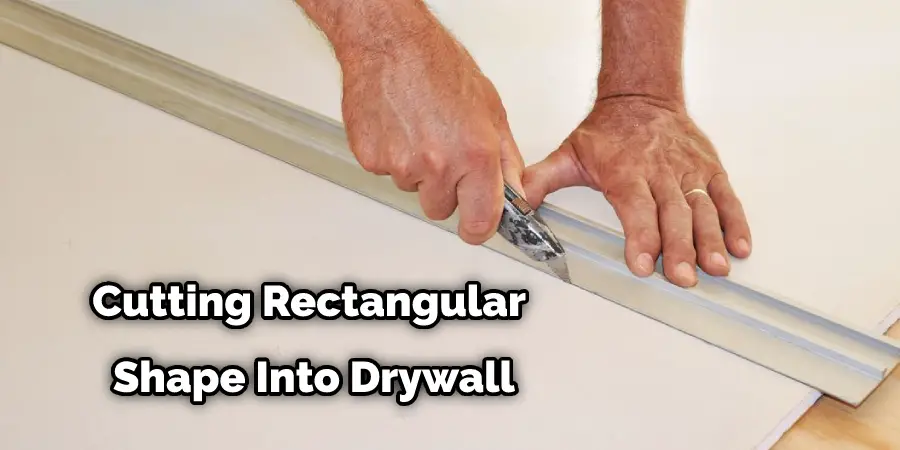
In order to cut a rectangular shape into the drywall, you must first use the bathroom light fixture as a guide. Once you have found the appropriate spot, carefully drop the rectangular shape down to the studs below.
Check to make sure that the light fixture is straightforward by using a small mirror and checking for obstructions along the way.
Step 4 : Time To Wire And Install The Junction Box.
At this time, you will need a junction box. Use the light fixture as a guide and drill a hole through the drywall where your mark was made.
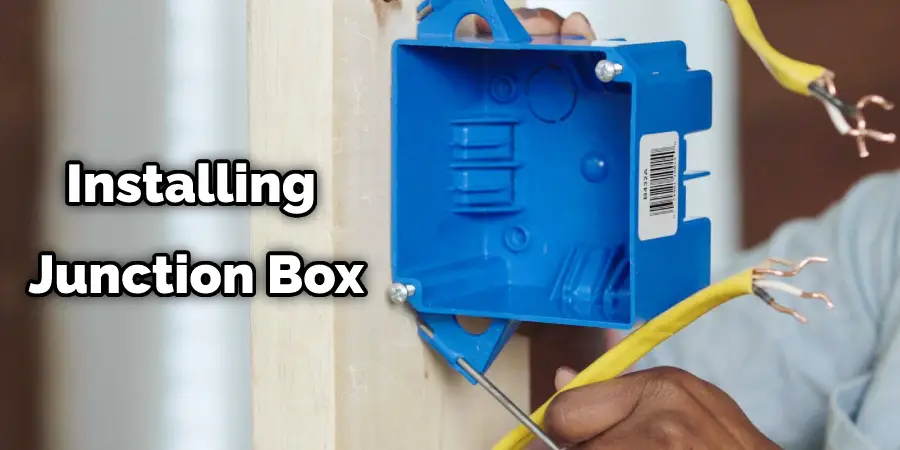
Next, attach the stud-mounted junction box with screws and move the bathroom light fixture inside using wire nuts, ensuring that it connects what light fixture.
Step 5 : Splice The Wire And Seal The Hole.
We cut the wire to length and put a loop on one side. A circle will make a stronger connection when we solder the wire back together.
Cut off about an inch of insulation from each end of the black wire coming from the switch box. This Is How You Want Your Stripped Wires to Look :
- Strip out 1/4″ of insulation from the end of one black wire.
- Strip out 1/2″ of insulation from both ends of the white wire coming from the switch box. This is how your stripped wires should look:
- At this point, you’ll want to twist together all three wires (one red, one black, and one white). This will help you when it comes time to solder the wires back together.
- Before soldering, you’ll need to slide some heat shrink tubing over each wire. First, slide about half the tubing onto the red wire, then slide all onto the white wire. You’ll want at least an inch or two of tubing on your white wire.
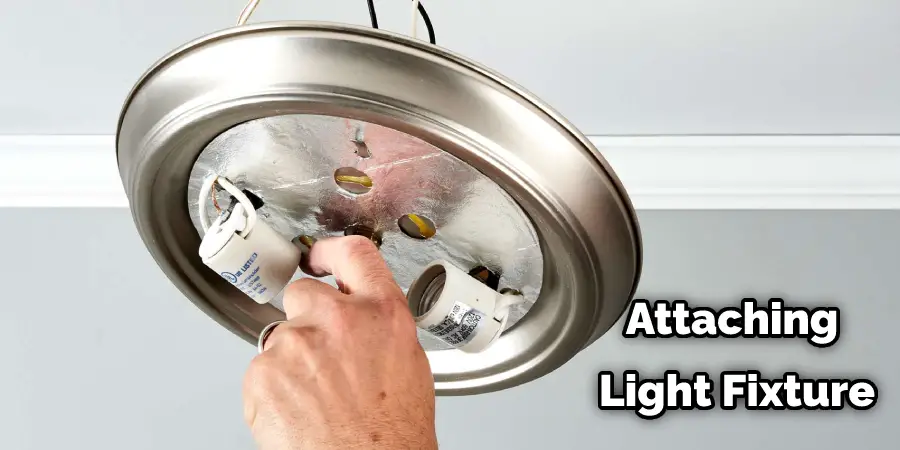
Step 6 : Let’s Get The Box And Fixture Together.
First, ensure that the box is securely fastened to the wall. You don’t want any accidents here, so take your time with how it’s wired together before moving on.
If you have an old house with plaster walls, be sure to pick up some plastic anchors for drywall installation as many times, these types of fixtures are too heavy for just drywall and plaster to hold up.
Once the box and drywall are installed, we can attach the fixture. Use your hands to position how you want it before drilling into the wall. Hold the institution in place, line up how you want it and then mark through each of the holes with a pencil on both sides so that when you drill into the wall, you won’t end up going through your bathroom tiles.
Then, drill a small hole for each of the screws and screw them in. If you have any trouble here, take a small piece of sandpaper and sand down the space between the screws and how far they protrude, so it’s easier to fit them in.
Step 7 : Let’s Test It Out.
Before you screw everything in place, turn the power back on and test the light to make sure it works. Then, go to the light switch and turn it on.
The fan and lights in the bathroom should work, and there should be a new dimmer mechanism for setting how bright you want the room’s lights to be.
Step 8 : Screw Everything In Place.
Start by replacing the cover for your junction box and tightening the screws to secure the fixture. Next, attach a hook to hang your new pendant lamp and replace the electrical box cover.
Step 9 : Enjoy Your New Lighting Fixture
Now you have a new lighting fixture over your bathroom sink and counter area, as well as a dimmer for how bright or how dark you want the room’s lights to be.

This is a big improvement from your super-bright light that just shined upwards onto your face.
You can check it to Change Chandelier Light Bulbs in High Ceilings
Tips and Warning
Tips
- Removal of the existing light fixture may be required. How to do this will depend upon the specific fixture being installed. This how-to guide does not cover how to move an existing light fixture.
- Additional wiring steps are required for moving light fixtures, so this how-to should only be undertaken by persons familiar with electrical wiring and household electricity. Therefore, a how-to guide will not be provided on how to wire a light fixture.
- Light fixtures currently connected to an electrical circuit require that the power source be shut off. How to do this will depend upon your specific how-to, but generally, it involves turning off/disconnecting appropriate breakers in your home’s main fuse box.
- Most how-to guides for moving a light fixture provide instructions on how to prepare the new location of the light before moving it. A how-to guide on how to install drywall or how to do basic masonry will not be provided.
Warning
- Make sure that the wire is disconnected from the light fixture before working on it. If it isn’t, you may get an electrical shock when attempting to move or install it.
When Do I Use A Surface Mount Box?
A surface mount box is an easy and popular way to hang a light fixture. It attaches directly to the ceiling, so there’s no need for anyone to get up on a ladder or step stool—just screw it in with silicon adhesive from below.
These boxes are sturdy but not as secure as some other options. Think of how light fixtures are typically mounted: with a hook and eye or wire. Those can hold more weight, but they require getting up on a ladder and attaching the fixture above. Surface mount boxes let you screw in your ceiling light without all that extra work but make for lighter fixtures overall.
Frequently Asked Question
What Are the Benefits of Moving a Bathroom Light Fixture?
When it comes to moving bathroom light fixtures, there are several reasons why you may want to make this change. However, the main reason is usually connected with how much space you have and what works best for your needs.
For example, if you do not have room in the current location because the plumbing vent pipes block where you want to mount the light, it will probably be necessary to relocate the fixture.
How to Move Bathroom Light Fixture Accomplished?
The cost and complexity of your current light source will play a role in how easy it is to replace. In some cases, you may be able to simply unscrew the old unit and install the new one in its place.
If that is not possible, then the light fixture will involve running new wiring to accommodate the change of location.
What Is the Best Method for Moving a Bathroom Light Fixture?
Since the bathroom light fixture will require making the wiring more accessible, it is best if this new location is close to where the power supply enters the room.
If you’re looking to save on wiring and conduit piping when moving bathroom light fixtures, the best bet is to do it yourself. That way, you’ll only have to deal with disconnecting and bringing down the old wiring from its current position.
If your bathroom light fixture moving is not possible, you may want to upgrade your lighting fixture as well as relocate it. Why? Well, some fixtures may not offer enough light for how you currently use the space.
You Can Check It Out to: Clean Oxidized Outdoor Light Fixtures
Conclusion
Moving a bathroom light fixture is not as difficult as it may seem. You can find detailed guides online to help you through this process, and we’ve provided some helpful tips in case your task becomes more complicated than expected.
And this is the simplest way how to move bathroom light fixture. Remember, doing the job yourself will save you time and money while also giving you a sense of accomplishment that many people lack these days!
Check it out also – How to Replace Under Cabinet Light Bulb